The Grid Method: What It Is, Where It Comes From, When to Put It Down
The grid method is a way of copying a picture onto a surface by dividing both into the same number of squares and drawing one square at a time. It is nearly six hundred years old, it is arithmetic rather than talent, and it has a limit that every good teacher names. This page is the method as knowledge: what it does to your seeing, the numbers behind it, and the two places it stops helping.
What the Grid Method Is
Take a reference picture and rule a grid of equal squares over it. Rule a grid with the same number of squares on the paper. The squares on the paper may be larger or smaller than the ones on the picture, but there must be as many of them, so that every square on the paper corresponds to exactly one square on the picture. Then draw what is in square A1 into square A1, what is in B1 into B1, and so on across the sheet. When every square is done, the outline of the picture is on the paper, at the new size, with its proportions intact.
That is the whole method. Everything else on this page explains why such a plain procedure works as well as it does, what it costs, and what the people who taught it for centuries said about when to stop.
Why It Works: the Eye Is Bad at Wholes and Good at Parts
Ask someone to draw a face from a photograph and they draw the face they know: eyes too high, too large, a mouth too wide. The knowledge of what a face is overrides the measurement of this face. Ask the same person to draw the contents of one two-centimetre square, and there is no face in it. There is a dark curve that enters a third of the way down the left edge and leaves at the bottom right corner. Nobody has a symbol for that. It has to be looked at, and looking is what drawing is.
The grid does a second thing that is easy to miss. It gives every mark a check. A line that leaves square C4 at a certain point on its right edge has to enter square D4 at the same point on its left edge, and the two marks either meet or they do not. Errors stop being a vague feeling that something is off and become a specific disagreement between two squares, which is a thing a beginner can fix.
And it is honest about proportion in a way the eye is not. A grid is a set of fixed reference points spread evenly over the whole picture. The distance from the eye to the chin is measured against the same lines as the distance from the chin to the collar, so the two cannot drift apart, which is exactly what happens when a drawing is built outward from the eyes.
Where It Comes From: Alberti's Veil and Dürer's Grid
The first written description is in Leon Battista Alberti's treatise on painting of 1435. In Book Two he recommends a device he calls the veil, or intersection: a thin, loosely woven cloth, stretched on a frame and divided by thicker threads into squares, placed between the eye and the subject. "Here in this parallel you will see the forehead, in that the nose, in another the cheeks," he writes, and he says plainly that he knows of nothing more useful. His reason is the one above: the veil "always presents to you the same unchanged plane", so a moving, three-dimensional subject becomes a fixed set of squares that can be transferred to a squared panel.
Ninety years later Albrecht Dürer made the device famous with a woodcut in his 1525 manual on measurement. A draughtsman sits at a table with a gridded frame in front of him and a sighting post to keep his eye still; on the table lies a sheet ruled with the same squares, and he draws what he sees through each square of the frame into the matching square on the paper. It is the grid method exactly as it is practised today, with the photograph standing in for the frame.
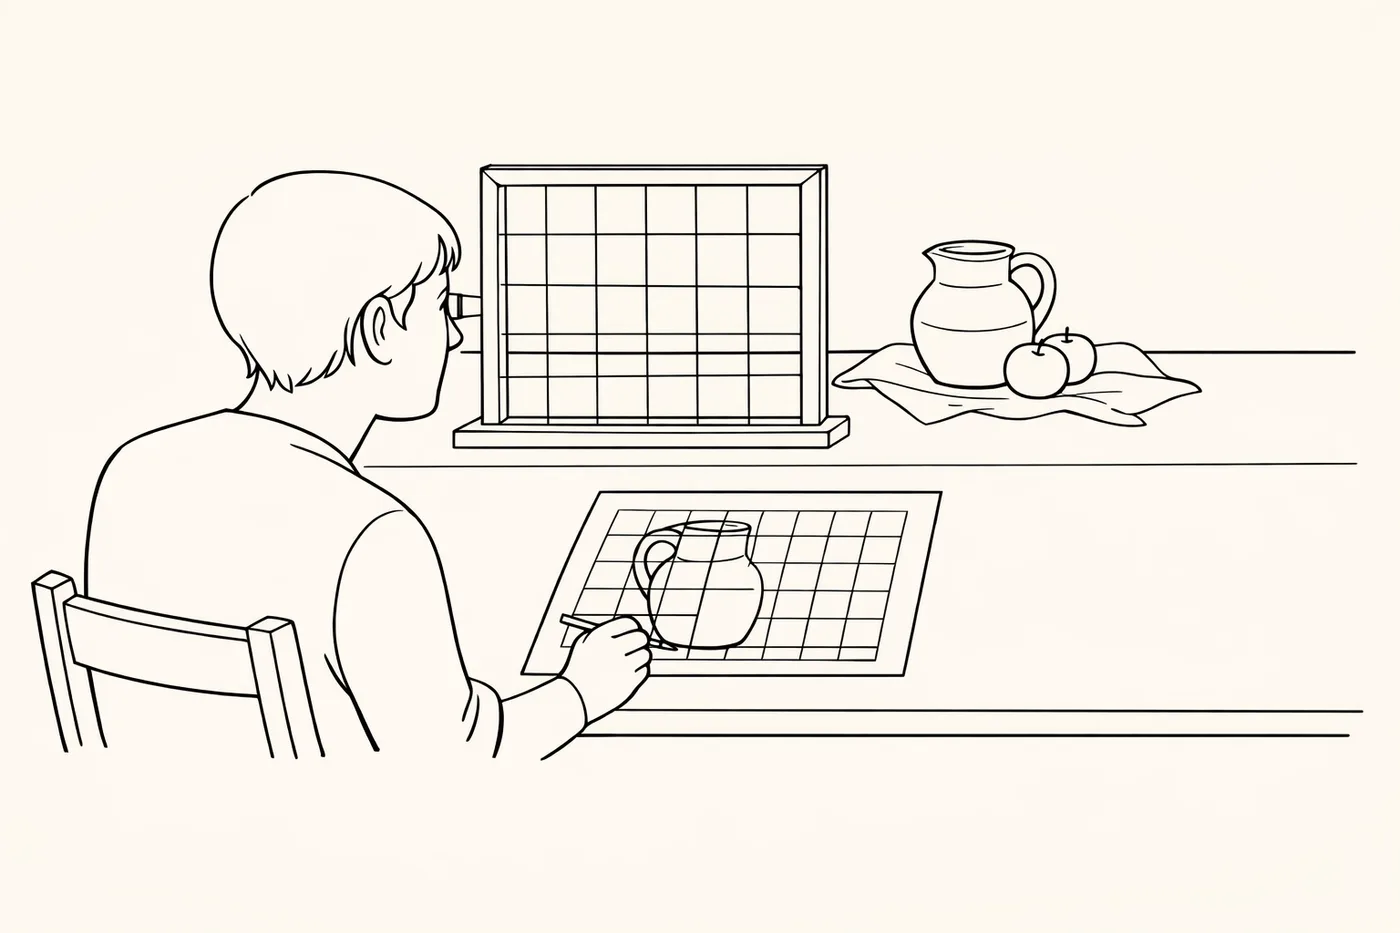

Neither man treated the device as a shortcut for the unskilled. Alberti wrote for painters, and Dürer's manual was a work of applied geometry for artists and craftsmen. The grid belonged to the same family of tools as the plumb line and the compass: instruments for getting a measurement right that the unaided eye gets wrong.
The Arithmetic: Scale, Cell Size and Detail
Two numbers govern a grid transfer, and they answer two different questions.
The scale factor is the size of a square on the paper divided by the size of the same square on the picture. A 2 cm square on the reference drawn as a 4 cm square on the paper doubles every length in the drawing, and because area grows with the square of the factor, it quadruples the area to be covered. The factor is the same whichever square you measure, which is why the method produces an enlargement with the proportions intact: nothing is stretched, because every part is multiplied by the same number.
The cell size decides how much of the drawing you are asked to judge at once. A useful rule is that a cell should be about the size of the smallest thing you must get right: an eye in a portrait, a window in a street, a leaf in a plant. Larger, and you are back to judging a whole feature by eye inside the square. Smaller, and you spend the session counting squares instead of drawing, and the result goes stiff, because no line was ever longer than a cell. Most portraits are drawn at eight to twelve cells across the head; most first attempts want four to six cells across the whole picture.
One consequence is worth spelling out. The count of cells has to match between picture and paper, but the size only has to match if you want the drawing at the size of the picture. Choosing the cell size on the paper first, in centimetres or inches, and letting the count follow from the picture, is what keeps the cells square on a sheet of a different shape; choosing a count and forcing it onto both turns every circle into an oval.
Where It Stops Helping
The method has two limits, and both were known to the people who taught it.
It places, and does nothing else. A grid tells you where an edge is. It has no opinion about which edge should be hard and which soft, how dark a shadow is, what to leave out, or whether the composition works. A drawing made entirely through a grid is accurate and lifeless in a way that is easy to recognise: the values jump at the cell boundaries, every line has the same weight, and nothing was decided. The grid is the placement pass. The drawing starts when the grid comes off.
It can become a dependency. The point of measuring cell by cell is that the questions it forces, where does this enter, where does it leave, how far along, migrate from the paper into the eye. After a dozen studies most people begin to see the halfway line of a figure or the eye line of a head without ruling it. The grid has done its work when it is no longer needed. A student who cannot begin without one has been taught the tool and not the seeing, and the remedy is to draw the same subject twice, once gridded and once not, and compare.
The honest comparison with the other ways of getting a picture onto paper, tracing, projecting, the camera lucida, is on its own page: grid method vs tracing vs projector. The grid is one of four answers there, and the text says when another is better.
The Mistakes That Undo It
- Grids that do not match. A 6 × 8 grid on the picture and a 6 × 9 grid on the paper, or one counted from the wrong corner. Count both, label both with the same letters and numbers, and check one address before you start.
- A grid that is not square. Freehand lines curve, and a small curve compounds across the sheet. Rule from a straightedge, measure every line from the same edge rather than from the previous line, and check that the two diagonals of the grid are equal.
- Lines through the features. A grid line running through the pupils or along the mouth hides the very edge you need. Move the grid on the picture by a few millimetres so the lines fall between features.
- Pressing hard. A grid drawn with a soft pencil under pressure dents the paper and never fully erases. Hard pencil, light hand; the grid is scaffolding.
- Drawing square by square to the end. Outline first, in every square, checking each new line against its neighbours. Shading comes after the grid is gone, across the lines, or the finished drawing keeps the checkerboard.
- Erasing too early. Keep the grid until every outline is in and checked against the reference; once it is gone there is nothing to check against.
Using It Today
The frame and the veil have become a photograph and a grid drawn over it. The grid for drawing puts equal squares over any picture in the browser, with letters and numbers, at a cell size you name in centimetres or inches; the transfer to canvas tool prints the matching empty grid onto your own sheet at true size, so the paper grid no longer has to be ruled by hand. For the full procedure from choosing a reference to removing the lines, the complete grid drawing guide walks through it step by step.
Frequently Asked Questions
- What is the grid method in art?
- A way of copying a picture onto a surface by dividing both into the same number of squares and drawing the contents of each square into the matching square. It transfers proportions exactly at any scale, because every part of the picture is multiplied by the same factor.
- Who invented the grid method?
- The first written account is Alberti's veil in his treatise on painting of 1435: a squared cloth held between the eye and the subject, with a matching squared panel to draw on. Dürer illustrated the device in his 1525 manual on measurement, in the woodcut of a draughtsman drawing a reclining woman through a gridded frame.
- Is the grid method cheating?
- No. It is a measuring instrument, taught by the painters who wrote the first treatises on painting, and it trains exactly the seeing that freehand drawing needs: where a line enters a square, where it leaves, how far along. What would be a problem is never taking it away. The grid is the placement pass; the drawing starts when it comes off.
- How many squares should a grid have?
- A cell should be about the size of the smallest thing you must get right. First attempts want four to six cells across the whole picture; a portrait wants eight to twelve cells across the head. More cells than that and you are counting rather than drawing.
- Does the grid on the paper have to be the same size as on the picture?
- No. Only the number of cells has to match. The cell size on the paper sets the size of the drawing: a 2 cm cell on the reference and a 4 cm cell on the paper double every length. Choose the cell size on the paper in centimetres or inches and let the count follow from the picture, so the cells stay square.
- When should I stop using a grid?
- When you start seeing the lines without ruling them, which for most people is after a dozen or so studies. Draw the same subject once with a grid and once without, and compare. If the freehand version places the features within a cell of the gridded one, the grid has done its work.
Sources
- On Painting, Book Two, Leon Battista Alberti, 1435, translated by John R. Spencer. The veil, or intersection: a thin woven cloth divided into squares, placed between the eye and the subject.
- Veil, Museo Galileo, Florence. Alberti's veil as the materialisation of the intersection of the visual pyramid.
- Draughtsman Making a Perspective Drawing of a Reclining Woman, The Metropolitan Museum of Art. Dürer's woodcut of the squared frame and the squared sheet, from the Underweysung der Messung of 1525.