The grid method transforms figure drawing from guesswork into precision. This systematic approach helps artists at all levels capture accurate human proportions and anatomy, turning complex forms into manageable sections for realistic results.
The Challenge of Human Figure Drawing (Beginner Reality)
Figure drawing usually fails at the placement stage, not the “shading stage.” If the pelvis is too high, the torso too long, or the knees sit in the wrong square, the figure reads wrong immediately.
Grids help because they turn vague placement (“the hand is about here”) into clear checkpoints (“the wrist crosses this grid line in square D6”).
If you’re new to the method, start with the complete grid drawing guide first.
A Beginner Workflow That Works (Grid + Gesture)
- Gesture line: one flowing line for the spine / main action.
- Big masses: ribcage (egg) + pelvis (box) inside the correct grid squares.
- Landmarks: shoulders, hips, knees, ankles, wrists (place by grid position).
- Limbs as cylinders: connect joints with simple tapered cylinders.
- Check: compare left vs right lengths and angles before adding anatomy detail.
Setting Up Your Figure Drawing Grid
Selecting Appropriate Reference Material
Quality reference selection significantly impacts the final drawing. Choose images with:
- Clear visibility of anatomical landmarks
- Good lighting that reveals form and structure
- Resolution sufficient to see important details
- Poses appropriate to current skill level
Begin with standing poses in neutral positions before progressing to dynamic or foreshortened poses. This progression allows for mastery of basic proportions before tackling more complex challenges.
Grid Density Considerations (Simple Guidance)
If you want a quick grid overlay for your reference, you can use our grid drawing tool. For beginners, the main goal is a grid you can finish without getting lost.
Grid density should match both the complexity of the pose and the desired level of detail:
Basic Standing Poses: A 6x8 grid typically suffices, providing enough reference points without overwhelming detail.
Seated or Reclining Figures: Consider 8x10 or 10x12 grids to capture the compression and foreshortening that occurs.
Action Poses or Complex Positions: Grids of 12x16 or finer help capture subtle shifts in proportion and dynamic angles.
Portrait Focus within Figures: When emphasizing facial features within a full figure, use a denser grid in the head area while maintaining standard density for the body. For detailed portrait work, refer to our guide on creating accurate portraits.
Proportional Guidelines for the Human Figure
Understanding standard human proportions enhances grid method effectiveness. These measurements provide a framework for checking accuracy:
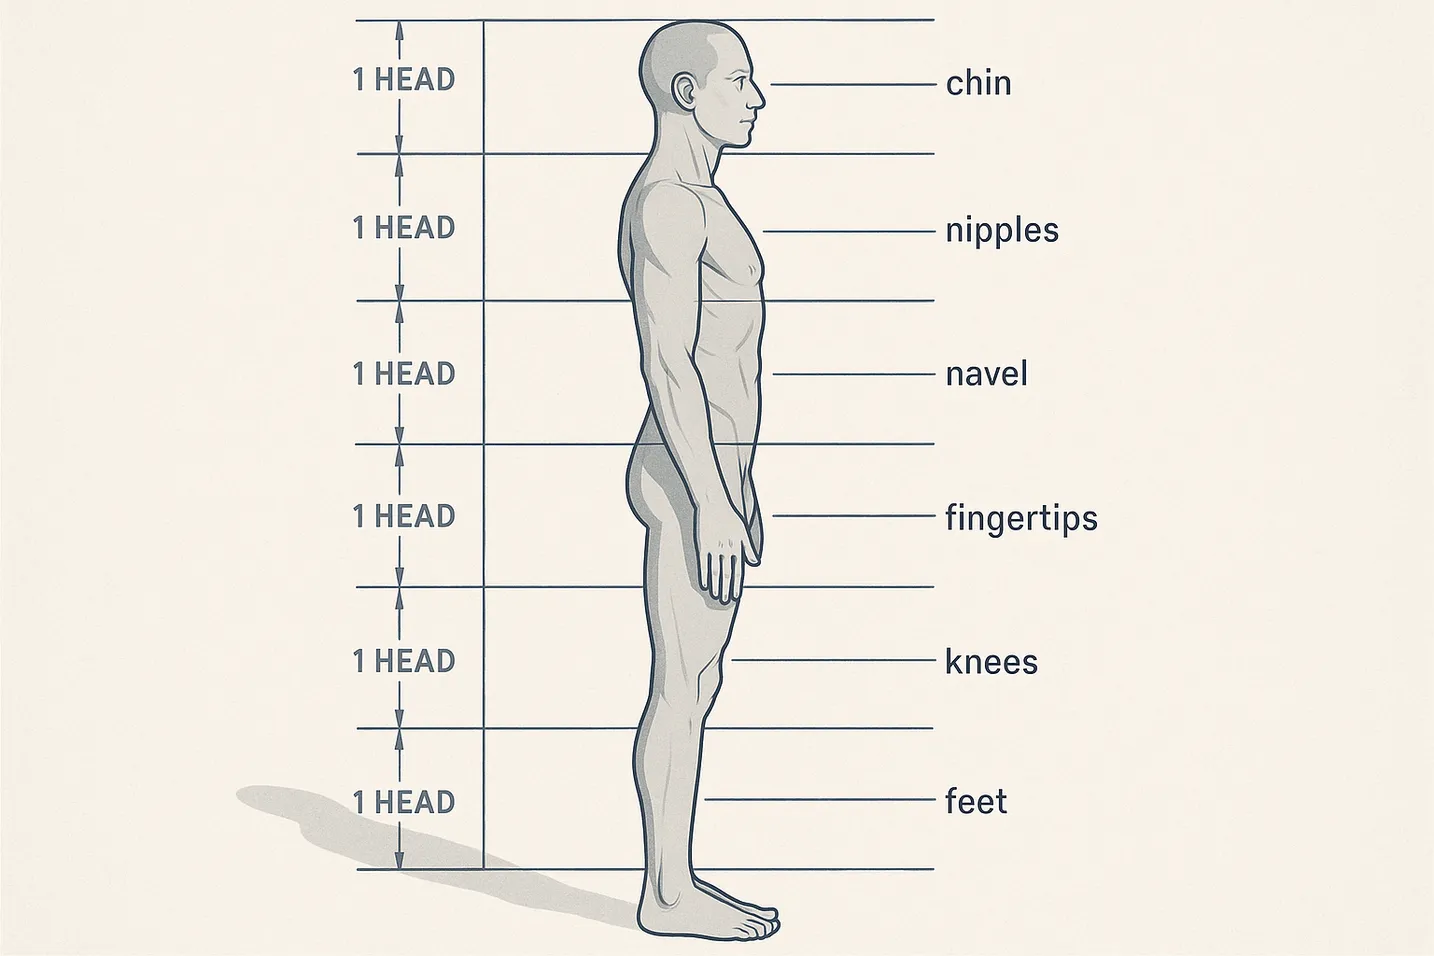
The Eight-Head Canon
Classical figure proportion uses the head as a unit of measurement:
- Total height equals approximately 8 head lengths
- Shoulders span 2-3 head widths
- Hips measure 1.5-2 head widths
- Arms extended equal total height
These proportions vary with age, gender, and individual characteristics, but provide reliable starting points for checking grid-based drawings.
Key Anatomical Landmarks
Within the grid system, certain anatomical points serve as crucial references:
- Halfway Point: The pubic bone typically falls at the figure's vertical center
- Nipple Line: Generally aligns with the second head unit from top
- Navel: Positioned at approximately 3 head units down
- Knees: Located at 6 head units from top
Transferring the Figure Using Grid Coordinates
Initial Mapping
Begin by identifying where major anatomical landmarks fall within the grid:
- Mark the top of the head and bottom of feet to establish overall height
- Locate the body's centerline
- Plot shoulder and hip positions
- Mark joint locations: elbows, knees, wrists, ankles
This initial mapping creates a proportional skeleton ensuring accuracy before adding details.
Building Form
With landmarks established, construct basic forms within each grid square:
- Simplify the torso into geometric shapes
- Treat limbs as cylinders with proper tapering
- Block in the head as an oval with centerline guides
Focus on one grid square at a time, observing how forms flow across grid boundaries. This methodical approach prevents proportion drift that occurs when drawing without reference structure.
Advanced Techniques for Figure Accuracy
Handling Foreshortening
Foreshortening presents particular challenges in figure drawing. The grid method excels here by revealing how dramatically proportions compress:
- Compare the grid squares occupied by foreshortened limbs versus those at normal angles
- Note how circular forms become elliptical
- Observe the dramatic size differences between near and far elements
Trust the grid measurements even when they contradict expectations about proportion. The grid reveals the true spatial relationships that our minds often misinterpret.
Capturing Dynamic Movement
Action poses require careful attention to:
- Weight Distribution: Note how the grid reveals shifts in the body's centerline
- Tension Lines: Follow how muscles and fabric create directional forces across grid squares
- Gesture Flow: Use the grid to track the overall movement path through the figure
Anatomical Detail Within the Grid
As proficiency develops, the grid facilitates increasingly detailed anatomical accuracy:
- Muscle Groups: Map major muscle forms to specific grid coordinates
- Skeletal Structure: Use grid intersections to locate bony landmarks
- Surface Details: Plot wrinkles, veins, and other surface features precisely
For specific challenging areas like hands, our step-by-step guide to drawing hands provides detailed grid-based techniques.
Refining Your Grid-Based Figure Drawings
Progressive Development
Work in stages to build drawings systematically:
Stage 1 - Construction: Light lines establishing basic proportions and positions
Stage 2 - Form Development: Adding volume and dimensional qualities
Stage 3 - Anatomical Refinement: Developing specific muscle groups and skeletal structure. For in-depth anatomical understanding, see our comprehensive anatomy guide
Stage 4 - Surface Details: Final details including texture, small forms, and finishing touches
Maintaining Accuracy Throughout
Regular proportion checks prevent accumulated errors:
- Measure distances between landmarks using grid units
- Compare symmetrical body parts for consistency
- Step back frequently to assess overall proportions
- Use grid intersections as alignment guides
Common Figure Drawing Challenges and Solutions
Proportion Drift
Even with a grid, proportions can gradually shift. Prevention strategies include:
- Completing all construction lines before developing any single area
- Working across the entire figure rather than finishing sections sequentially
- Regularly comparing measurements to the original grid reference
Stiff or Mechanical Appearance
While grids ensure accuracy, they can lead to rigid-looking figures. Combat this by:
- Emphasizing gesture and flow lines that cross grid boundaries
- Varying line weights to suggest form and movement
- Allowing organic forms to flow naturally within the grid structure
Complex Overlapping Forms
When body parts overlap or intertwine:
- Use the grid to track which elements appear in foreground versus background
- Note how overlapping changes apparent proportions
- Maintain clear spatial relationships through careful observation
Developing Your Figure Drawing Practice
Systematic practice accelerates improvement:
Fundamental Exercises:
- Draw the same pose at different grid densities
- Practice individual body parts before attempting full figures
- Study skeletal and muscular anatomy using grid overlays
Progressive Challenges:
- Begin with standing poses, progress to seated, then reclining
- Move from single figures to multiple figure compositions
- Advance from static poses to dynamic action
Analysis and Refinement:
- Compare finished drawings to references using grid overlays
- Identify consistent proportion challenges
- Adjust grid density based on accuracy needs
Professional Applications
The grid method serves various professional contexts:
Commission Work: Ensures client satisfaction through accurate likeness and proportion
Medical and Scientific Illustration: Provides precision required for anatomical accuracy
Animation and Character Design: Maintains consistent proportions across multiple drawings
Educational Materials: Creates clear, accurate references for teaching
The technique scales from quick gesture studies to highly detailed finished works, adapting to project requirements while maintaining proportional integrity.
Figure Drawing Grid Method Questions
For further study, explore anatomy grid technique and figure grid drawing.
Ready to Try the Grid Method?
Put these techniques into practice with our free grid generator tool—trusted by 170,000+ artists worldwide.
Create Your Grid Now →