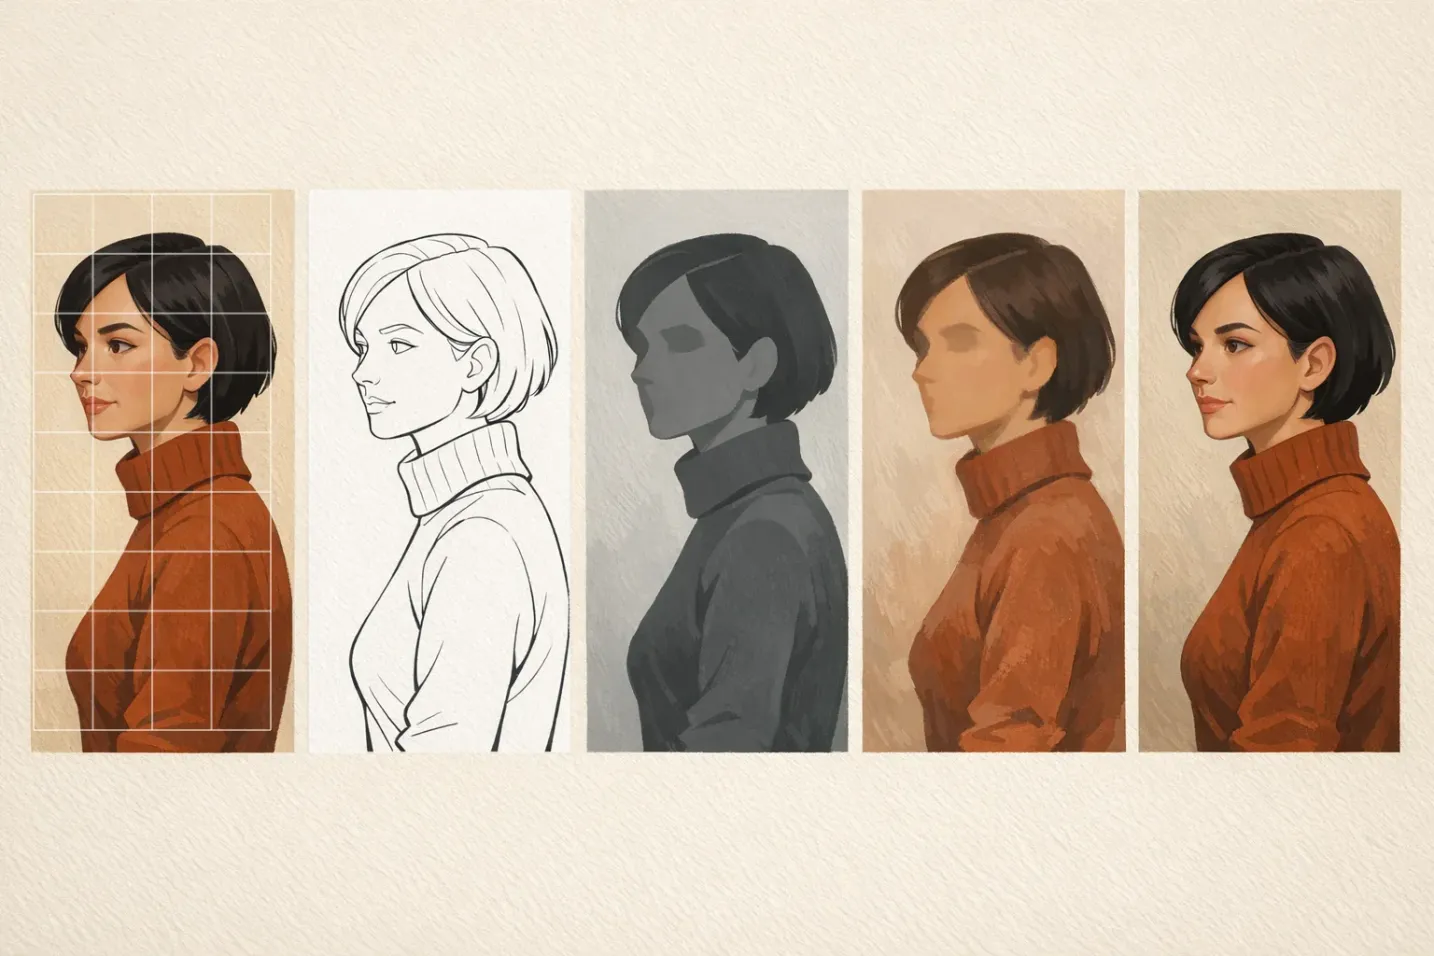

You can already grid a photo and pull a decent likeness out of it in pencil. Paint is a different job: the drawing has to survive being covered up, the values have to be decided before the color goes on, and every hour you spend fixing proportions in wet paint is an hour you don't spend painting. This is the five-stage sequence that gets you from a gridded photograph to a finished portrait, with the materials, the rough timings and the one mistake that ruins each stage.
The five stages at a glance
Stage one grids the reference and settles the values. Stage two puts an accurate drawing on canvas. Stage three covers the whole canvas in three values. Stage four turns those values into skin. Stage five decides where the viewer looks. Nothing in stage four can rescue a bad stage two, which is why the drawing gets its own stage instead of being rushed on the morning you start painting.
The example throughout: a head-and-shoulders portrait from an 8x10 inch photograph onto a 40x50 cm canvas: a standard shop size, and the reason the arithmetic works out so cleanly.
Stage 1: Grid the reference and plan your values
Print the reference at 8x10 inches and lay a grid of 1-inch cells over it: 8 columns by 10 rows, 80 cells. That density is right for a head: each eye lands inside roughly one cell, so a misplaced pupil is a one-cell problem, not a whole-face problem. That is about half the density the graphite guide asks for, and deliberately so. A loaded brush covers more ground than a pencil point, so a finer grid buys precision you cannot execute in paint, which is the same reason charcoal wants a coarser grid still. Generate the grid digitally rather than ruling it by hand; a printed line that is a millimeter off is an error you will faithfully copy twenty times. In GridMyPic, load the photo, set an 8x10 division, and switch on coordinate labels so you can call out "C4" instead of counting rows every time. Set up your reference grid.
Then do the part most painters skip. Print a second copy in grayscale and squint at it until the detail collapses, and mark every cell as one of three things: shadow, halftone, or light. Write the numbers straight onto the print: 1 for shadow, 2 for halftone, 3 for light. Dark to light, so the direction matches a bought value scale. That map is the plan for stage three, and making it now, with the photo in front of you and no wet paint on the brush, takes twenty minutes instead of two hours of indecision later.
Time: 20-30 minutes. Materials: the printed reference, a grayscale copy, a pen.
Mistake to avoid: gridding a reference that is too small or too dark in the shadows. If you cannot see the edge of the jaw against the background in the print, you will invent it on the canvas. Invented edges are the first thing that reads as "not quite them".
Stage 2: Transfer the drawing to canvas
Use the same grid count on the canvas: 8 columns by 10 rows. On a 40x50 cm canvas each cell is exactly 5 cm square, so a 1-inch reference cell becomes a 5 cm canvas cell, an enlargement of just under 2x. Identical counts are the whole point. The cell is the unit of measurement, and as long as C4 on the photo is C4 on the canvas, the scale factor takes care of itself.
Two ways to draw the lines. Thinned burnt umber (a little oil color cut with odorless mineral spirits to the consistency of ink, applied with a rigger or a small round) disappears under the first layer of paint and never contaminates anything, because it is the same material as the painting. Or 2H graphite, which stays crisp and lets you erase, but must be applied with almost no pressure: a hard pencil pushed into primed canvas grooves the surface permanently. Vine charcoal is a third option and wipes away entirely with a dry cloth, but it will gray your first flesh mixtures if you leave it on.
Draw the head with the grid, not around it. Work cell by cell, plotting where the contour enters and leaves each 5 cm square, and check the landmarks that carry the likeness first: outer corners of the eyes, the base of the nose, the corners of the mouth, the width of the head at the cheekbones. Get those four right and the rest can be adjusted.
Time: 45-90 minutes. Materials: 40x50 cm canvas, straightedge, 2H pencil or thinned burnt umber and a rigger brush, kneaded eraser.
Mistake to avoid: starting to render. This stage produces a map of shapes and boundaries, not shading. Every minute spent on eyelashes here is deleted in stage three.
Stage 3: Block in three values
Cover the entire canvas. No white should be showing when this stage ends, including the background. An unpainted patch makes every value next to it look wrong, so you will keep correcting things that were already correct.
Mix exactly three piles on the palette from your value map: a dark for the shadow shapes, a mid for the halftones, a light for the lit planes. In oil, thin them with a little solvent so they go on lean and dry fast. In acrylic, use them straight from the tube with a touch of water. Use a big brush (a size 10 or 12 flat on a canvas this size) and lay the shapes in flat, edge to edge, exactly where the numbers on your grayscale print say they go. A portrait blocked in correctly at this stage already looks like the person from across the room; at arm's length it looks like nothing at all. That is the correct result.
Keep the paint thin. Everything after this goes on top, and thicker layers over thinner ones is the sequence that stops oil paintings cracking.
Time: 1-2 hours. Materials: three pre-mixed values, a large flat brush, solvent or water.
Mistake to avoid: blending the three values into each other while they are wet. The transitions are stage five's job. Blending now gives you a uniform gray mush with no structure to build on.
Stage 4: Mix the flesh tones
Five colors do the whole head: titanium white, yellow ochre, cadmium red light, burnt umber, and ultramarine blue. That is a variant of the limited palette portrait painters have used for centuries, and it holds together precisely because it cannot produce a color that clashes with the rest of the canvas.
The base mixture for lit skin is white plus yellow ochre plus a small amount of cadmium red light. Start with far less red than you think, because you can always add more and skin that has gone pink is very hard to walk back. Burnt umber warms and darkens it toward the shadow; ultramarine cools it.
Shadows on skin lit by a warm light source go cooler, not just darker. Take your light mixture, add burnt umber to drop the value, then add a touch of ultramarine to shift the temperature. Reach for black only once you know why: it flattens skin fast, and mixing your darks from umber plus ultramarine keeps the transparency that makes skin look like skin. Where light bounces back into the shadow from a collar or a wall, the reflected light is warmer again but still darker than anything in the lit half; keeping it dark is what stops the shadow side falling apart.
Work over your three-value block-in, one region at a time: forehead, cheeks, nose, mouth area, neck. Each region keeps the value the block-in already established and only gains color and temperature.
Time: 2-4 hours, and this is the stage that most often runs across two sessions.
Mistake to avoid: mixing flesh tones one brushload at a time. Mix a generous pile of your base light and your base shadow before you start, and modify from those. Remixing from scratch halfway through guarantees the second cheek won't match the first.
Stage 5: Refine edges, then place the highlights
Likeness is decided in stage two; the sense that a painting is finished is decided here, and almost entirely by edges. Pick one focal point, which for a portrait is nearly always the eye closer to the viewer, and make the edges hard there: the upper lash line, the corner of the iris, the shadow under the top lid. Everything else softens as it moves away. The far edge of the cheek, the hairline against the background, the underside of the jaw: soften those with a clean dry brush until they lose their boundary. A head with hard edges everywhere looks cut out and pasted on; one with graded edges sits in air.
Highlights go last, and there are fewer than you want to paint. The wet catchlight in the eye, the tip of the nose, the top plane of the lower lip, sometimes the point of the chin. Place them thickly, with one loaded stroke, and leave them alone. Because they are the lightest and thickest paint on the canvas, they read as the surface closest to the viewer, which is exactly what you want at the front of a face.
Time: 2-3 hours. Materials: a soft blending brush kept clean and dry, a small filbert for highlights, and the discipline to stop.
Mistake to avoid: working a highlight back into the surrounding paint. Once it is stroked on, put the brush down.
Where the grid stops helping
The grid gets an accurate drawing onto the canvas and nothing more. It cannot tell you a warm shadow from a cool one, it will not choose an edge for you, and it has no opinion about which highlight to leave out. What it does is remove proportion from the list of things you are worrying about while you make those decisions, which is the entire reason it belongs in a painting workflow.
If you want the canvas gridded at true scale rather than measured out with a ruler, GridMyPic's Grid on Canvas mode takes your real canvas dimensions in centimeters, computes the cell size, and exports a PDF that prints at exactly that size. Measure one cell to confirm before you commit paint. For the drawing fundamentals underneath all of this, the complete grid drawing guide covers grid setup in depth.
Portrait painting with the grid method
For the drawing stage in more depth, see accurate graphite portraits and proportion with the grid method.
Ready to Try the Grid Method?
Put these techniques into practice with our free grid generator tool—trusted by 170,000+ artists worldwide.
Create Your Grid Now →