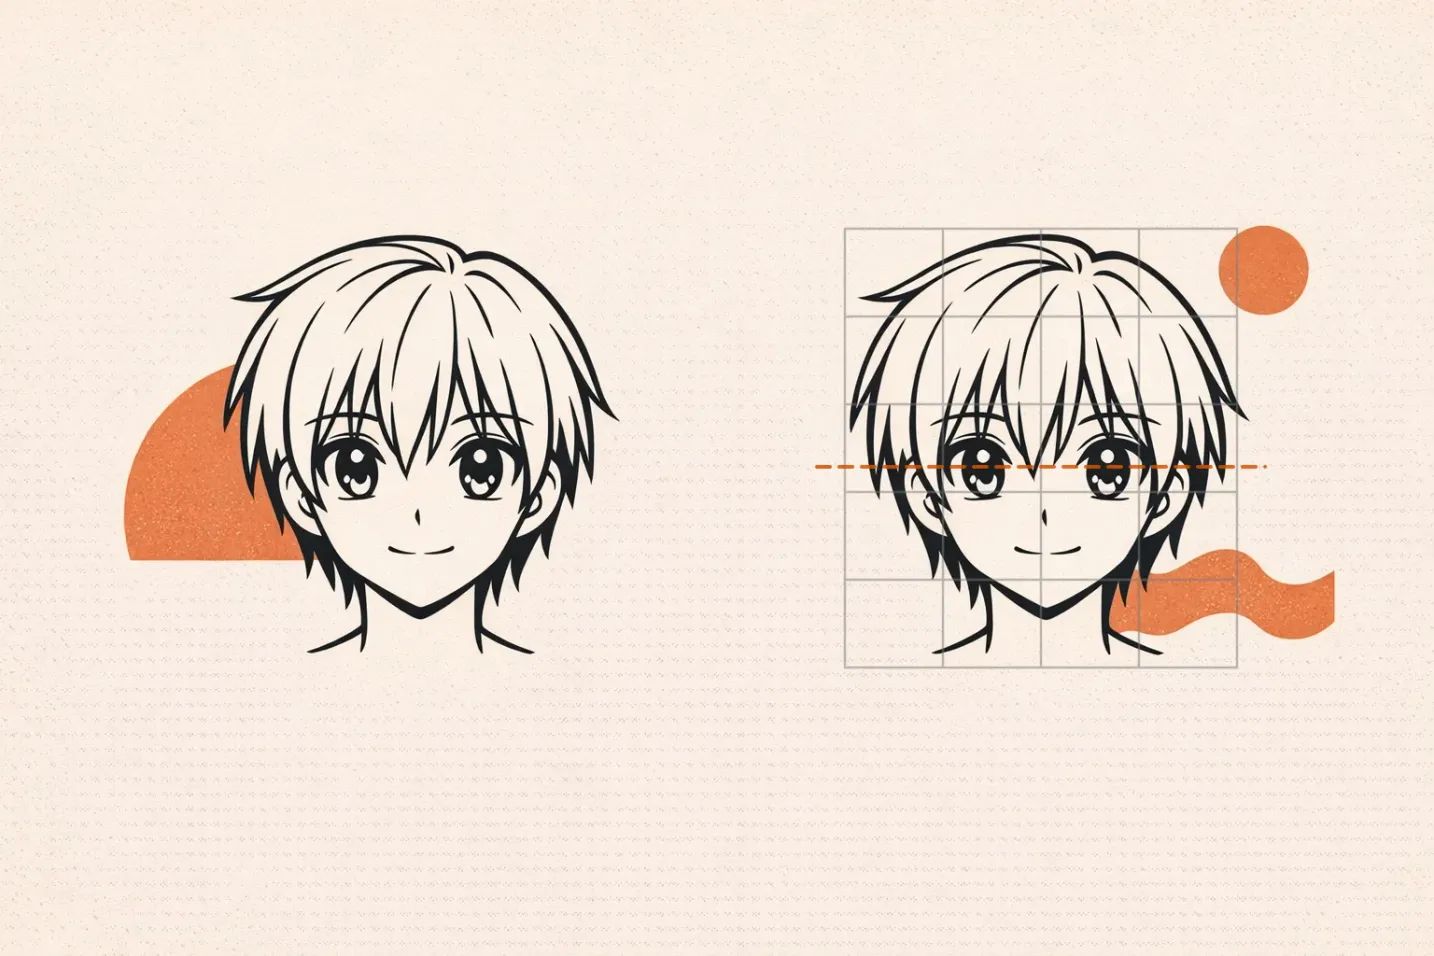

Manga and anime characters live and die by proportions: a head count that fixes the body, an eye line that sits lower than a realistic face, eyes that take up a third of the head. A grid lets you measure all of it instead of guessing.
Why Anime Proportions Have to Be Measured
Copying an anime character freehand usually fails in a predictable way. The head comes out too small for the body, the eyes drift too high, and the face reads as a slightly-off Western cartoon instead of the character you were looking at. None of that is a talent problem. It happens because stylized proportions are deliberate departures from realistic anatomy, and your eye has spent its whole life learning realistic anatomy.
The grid method fixes this by turning a drawing into a series of small, checkable measurements. You divide the reference and your paper into matching squares, then copy one square at a time. Every proportion below can be expressed as "which cell does this land in," which is a question you can answer with certainty rather than intuition.
If you want your character proportions to stay consistent while you refine the face, hair and costume, start from a gridded reference - you can make one with our grid for drawing.
The Numbers Worth Knowing Before You Start
Head Count Sets the Body
Anime body proportions are measured in head heights: you take the height of the character's head from the top of the skull to the bottom of the chin, and count how many of those fit into the total figure.
- Chibi and super-deformed characters: 2 to 3 heads tall. Almost the entire design is head. The body becomes a compressed suggestion of a torso and limbs, and hands and feet are simplified to rounded shapes.
- Standard shoujo and shounen characters: about 7 to 7.5 heads tall. This is the everyday range for teenage and young adult characters in most series: the same head count as a realistic adult, which is why these characters read as ordinary people even though the face is heavily stylised.
- Heroic and adult action characters: about 8 heads tall. The extra height goes mostly into the legs, which is why these characters read as imposing even standing still.
A grid pins this down immediately. Set your cell size so the character's head is a whole number of cells tall - four cells is a convenient choice - and the whole figure now has a ruler running down it. A 7-head character is 28 cells tall; a 3-head chibi is 12. If your drawing runs to 30 cells, you have stretched the body, and you can see exactly where.
The Eye Line Sits Lower Than You Think
On a realistic head, the eyes fall exactly at the horizontal midline - halfway between the top of the skull and the bottom of the chin. Beginners routinely place them higher, because the face feels like it should be centered and the cranium above it gets ignored.
Anime faces move that line further in the same direction: the eye line sits at or below the head's horizontal midline. Dropping it lowers the visible face and enlarges the forehead and cranium, which is a large part of why anime characters read as young. The younger or cuter the character, the further below the midline the eyes tend to go.
With a head that is four cells tall, the midline is two cells down from the top of the head. Check your reference against it: if the eye centers sit on that line, you are looking at realistic placement. If they sit a fraction of a cell under it, measure that fraction and reproduce it - that offset is a large part of the style.
Eye Height Carries the Style
A single anime eye is typically a quarter to a third as tall as the face is long, measuring the face from hairline to chin. On a realistic face the eye is a small fraction of that. This one measurement does more stylistic work than any other, and it is the one most often flubbed by memory.
Grid it directly. Note how many cells - or what fraction of a cell - the eye occupies vertically in the reference, and match it. Then check the horizontal: the gap between the two eyes in manga is often about one eye wide, but styles vary enormously, so read it off the reference rather than trusting a rule.
The Nose Is a Mark, Not a Feature
Anime noses are usually reduced to a small mark, a shadow wedge or a single dot, sitting roughly two-thirds of the way down the face from hairline to chin - the same place a realistic nose base sits. Anime moves the eyes, not the nose, which is part of why the eyes read as so large. Drawing a fully rendered nose at that mark is the fastest way to break the style. The mouth is a short line somewhere between the nose mark and the chin - the exact spot is a style choice, so let the grid tell you where the reference put it.
The Complete Workflow
- Pick a clean reference. A high-resolution image with readable line work. Front-facing or three-quarter views are far easier to grid than extreme angles.
- Decide your enlargement ratio. This replaces any fixed "use a 1-inch grid" advice. If you want a drawing twice the size of the reference, then 1 inch on the reference becomes 2 inches on paper - a 2x enlargement. Same-size copying is 1:1; a 3x enlargement means 1 inch becomes 3 inches.
- Grid the reference. Draw or overlay a grid of uniform squares. Choose the cell size so the character's head is a whole number of cells tall, then keep every cell identical - the method depends on it.
- Label the grid. Letters across the top, numbers down the side, so every cell has an address like B4. You will need this the moment you lose your place.
- Grid your paper at the ratio. Same number of cells, same labels, cell size multiplied by your ratio. If the reference is a 1-inch grid at 2x, your paper grid is 2 inches. Draw these lines lightly - you will erase them later.
- Mark the proportional landmarks first. Before any detail, draw light horizontal lines for the top of the head, chin, eye line, nose mark and the bottom of the feet. Count the head heights down the figure and confirm they match the ranges above. If the count comes out short, the legs are too short: lengthen from the hip, not the torso.
- Block in shapes, one cell at a time. Work from the top left across and down. Look at where each contour enters a cell edge and where it leaves - it is the intersections you copy, not the object.
- Check the face against the reference before rendering. Is the eye line at or below the midline? Is the eye a quarter to a third of the face height? Is the nose a small mark around the two-thirds point? Fix these now; they are painful to fix after shading.
- Draw the hair as a mass, then split it. Hair is the least grid-friendly element. Use the grid to place the outer silhouette and the hairline, then work the internal strands freehand so they keep their flow.
- Line, shade, then erase the grid. Vary your line weight - heavier on outer contours, lighter on internal detail - and use the grid to locate shadow shapes before you commit to them. Erase the guide lines last.
An Optional Second Pass for the Eyes
Because anime eyes carry most of the expression, some artists want more resolution there than the base grid gives. That is a legitimate second pass, but treat it as exactly that.
Finish the base transfer with uniform cells first. Then, on a separate light pass, subdivide only the cells containing the eyes - halving them, then halving again if you need to - so the subdivisions still line up with the base grid. Iris position and highlight placement become much easier to match this way.
What does not work is building a grid with different cell sizes in different regions from the start. Non-uniform cells break the base method: the whole system relies on every cell in the reference mapping to an identically proportioned cell on your paper. Once the cells differ, the coordinates stop being comparable.
Digital Tools and Software
Before the grid even goes on, GridMyPic's Outline Studio can turn your reference into clean line art: one strength slider extracts the contours - processed entirely in your browser - which is exactly the line-first way manga is drawn. Grid the resulting outline and you transfer linework instead of guessing at a photo. Try it on your reference.
Drawing software adds two useful things on top. A grid on its own layer can be toggled on and off, so you can check proportions without permanent pencil lines on the page. And layer separation lets you keep the grid, the block-in, the line art and the shading apart, so revising one does not damage the others.
Working Toward Not Needing the Grid
Start with a single head rather than a full figure - fewer cells, faster feedback. Then a bust, then a full standing character, then a pose with foreshortening. For action poses, a hybrid works well: grid the head and torso to lock placement and scale, then draw flowing hair, capes and limbs freehand so they keep their energy.
The grid is training, not a permanent crutch. After enough repetitions you start seeing the measurements without drawing the lines - the eye line reads as low, the head count reads as seven, the eye reads as a third of the face. At that point you can grid selectively, or skip it entirely and use it only to check a drawing that feels wrong.
Common Questions About Grid Drawing for Manga and Anime
For proportional groundwork beyond the face, see Mastering Anatomy with the Grid Method, and for action poses, How to Draw Dynamic Figures with Gesture and Grid Techniques.
Ready to Try the Grid Method?
Put these techniques into practice with our free grid generator tool—trusted by 170,000+ artists worldwide.
Create Your Grid Now →