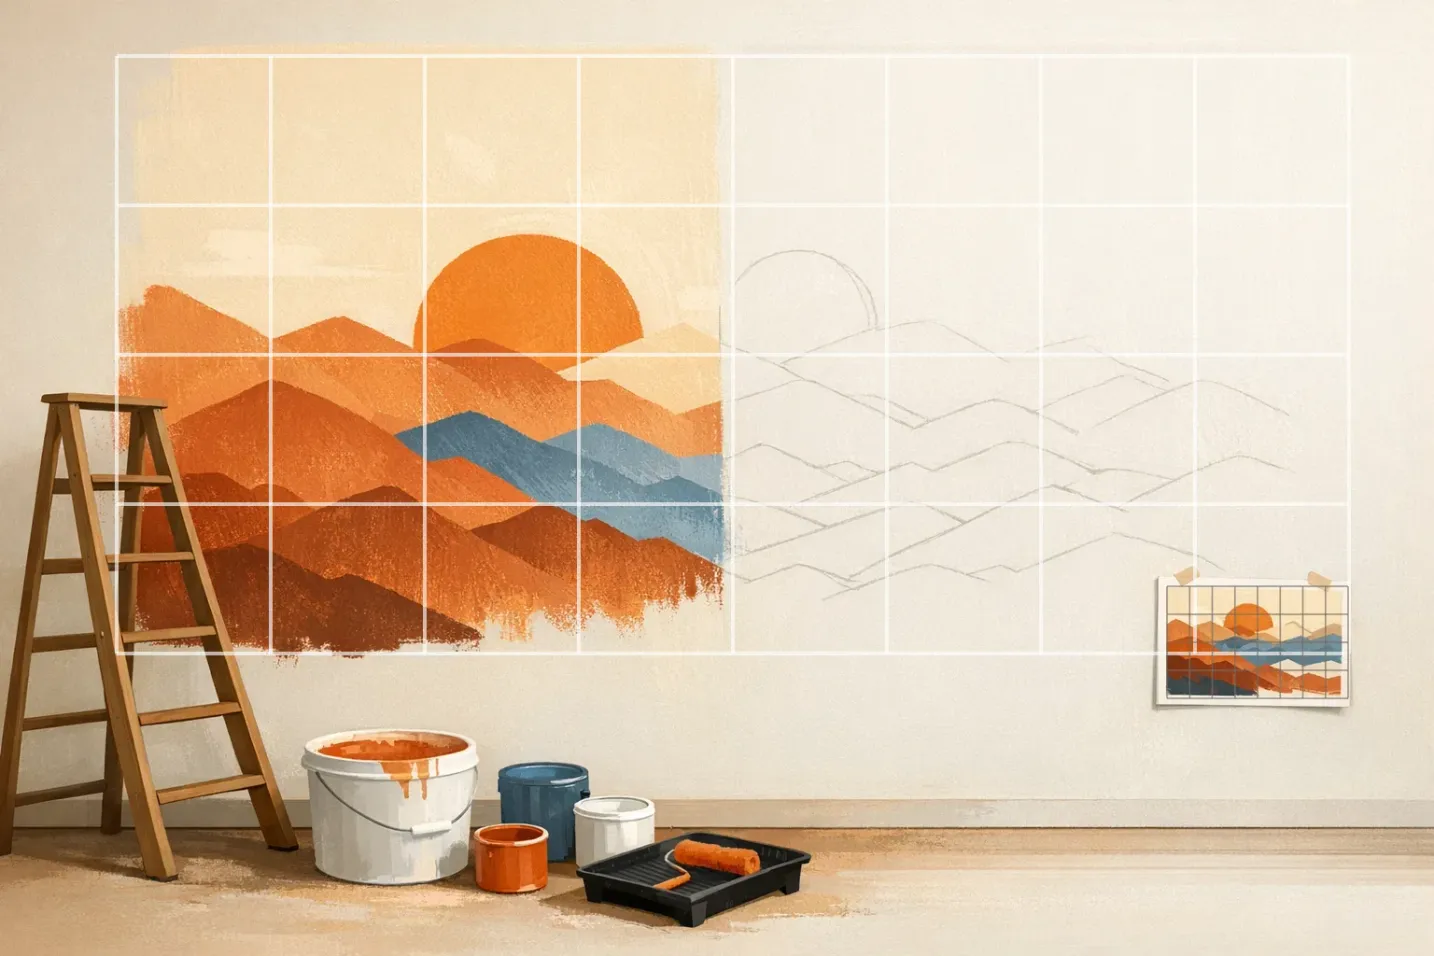

Scaling a small study onto a wall is not a harder kind of drawing. It is the same drawing multiplied by one number. Get that number right and everything downstream follows from it: how big your squares are, how much paint to buy, how many days to block out. What sinks large-format work is almost never weak painting. It is a grid that was never squared to the wall in the first place.
This whole article follows one job: an 8x10 inch reference going onto an 8x10 foot wall. Every measurement below comes from that example, so you can swap in your own dimensions and run the same arithmetic.
Start With One Number: Your Scaling Factor
Convert both sides to the same unit before you divide. Eight feet is 96 inches, and 96 ÷ 8 = 12. Ten feet is 120 inches, and 120 ÷ 10 = 12. Both axes give the same answer, which is the confirmation you want: the reference and the wall share an aspect ratio, so a single factor of 12 governs the entire job.
Now the grid falls out of it. Draw 1-inch squares on the reference and you get an 8 x 10 grid: 80 cells. Multiply the cell by 12 and each wall square becomes 1 foot. That is the sweet spot for wall work: a square you can fill comfortably from one standing position, small enough that a misplaced contour stays trapped inside it, large enough that 80 cells cover the whole wall instead of 800.
If your two axes give different factors, stop. You have a cropping problem, not a scaling problem. Crop the reference to the wall's proportion first. Never stretch one axis to fit, because a 4 percent horizontal stretch that nobody notices on a postcard turns faces visibly wide at architectural size. Set the crop and the cell size in the grid for drawing tool, and read the factor off the two numbers before you commit to anything physical.
Linear ×12 Means Area ×144
This is the fact that catches people out, and it is pure geometry: when the linear factor is 12, area grows by 12², which is 144.
Run the numbers on our example. The 8x10 inch study covers 80 square inches. The 8x10 foot wall covers 80 square feet, which is 11,520 square inches. Same 80 cells, 144 times the surface.
Three consequences, and all of them are budget items:
Paint. Coverage is sold and consumed per area. If a colour mix filled a passage on the study, the same passage on the wall wants roughly 144 times that volume — before primer, before the second coat that any wall in real light will need. Mix large batches of your key colours in one go; matching a mixed grey three weeks later across a 12-foot span is a fight you will lose.
Time. Brush mileage tracks area, not width. Large flat passages do go faster per square foot once you switch to wall brushes and rollers, but detail does not scale down in effort. A hand that took twenty minutes on the study is now a foot across and takes longer, not less. Assume the broad areas outrun your estimate and the detail areas blow through it.
Mark size. Your marks scale by 12 too. A crisp 1 mm pencil line on the study is a 12 mm stripe on the wall. Choose brush widths by the factor rather than by habit, or the painting reads as a blown-up sketch instead of a painting made at its own size.
Print the Reference Full Size With Print Poster
The tool side of this workflow is covered by GridMyPic's Print Poster feature, built exactly for large-scale transfers: it slices your gridded reference across multiple sheets (A0 down to A5, US Letter, Legal or Tabloid) with solid cut lines, dashed glue strips and a configurable overlap so imperfect cuts still join cleanly. A true-to-size check confirms that grid squares print at exactly the size you configured before you commit paper, and every page carries assembly guides. Tape the sheets together and you have a full-size cartoon for the wall. Open the grid maker, set up your grid, and choose Print Poster in the export bar.
For the 8x10 job, the practical use is the middle step. You rarely want a paper cartoon at the full 8x10 feet, but a tiled A3 print at, say, a factor of 3 gives you a 24x30 inch intermediate reference you can pin next to the wall at working height: big enough to read contours from six feet away, cheap enough to mark up with notes, and gridded in the exact same cell structure as the wall. Run the true-to-size check on the first sheet before printing the rest; a printer set to "fit to page" will silently shrink everything by a few percent and quietly poison every measurement you take from it afterwards.
Snapping the Grid Onto the Wall
Paper grids are drawn. Wall grids are snapped, and the technique matters.
Establish two master lines first. One true horizontal and one true vertical, found with a spirit level, laser level or plumb bob, not measured off the floor or the corner. Floors slope, corners lean, and a grid referenced to a crooked room inherits the crookedness. Everything else gets measured from these two lines.
Use a chalk snap line for the rest. Mark your foot intervals along the master lines, hook the line at one mark, pull it taut to the matching mark on the opposite side, then lift it a hand's width out from the wall at the midpoint, straight out, not sideways, and let go. Under about 15 feet you can snap it alone. Over 20 feet the string sags and prints a curve, so work in pairs: one person at each end, with someone pressing the string flat at the midpoint so you snap it in two halves. Use blue or white chalk; red is formulated to be permanent and you will be painting over it forever.
Mark intersections with low-tack tape. Artist's tape or washi at the key crossing points survives longer than chalk, lifts cleanly off primer, and gives you something to re-align against after the chalk has been brushed away by sleeves and scaffolding. Keep the tape off any area you will paint that day.
Why not just project it? Projection looks like the shortcut and usually is not. It needs throw distance you rarely have in a corridor or lobby, it keystones the moment the projector sits off the wall's centre axis, and it washes out in exactly the daylit spaces murals tend to live in. The deeper problem is recovery: bump the projector on day four and your alignment is gone, whereas a snapped grid is still on the wall and still re-measurable in week three. Project if you like, but snap the grid as well, so you have something to check against.
Errors Scale, They Do Not Explode
Scaling is linear, and so is error. A 2 percent placement error on the sketch is still 2 percent on the wall. What changes is the absolute size: 2 percent of 8 inches is about a sixth of an inch and nobody sees it, while 2 percent of 8 feet is nearly 2 inches and it is visible from across the street. The error did not grow faster than the work; it simply became large enough to read.
Accumulation is a different failure, and it is the avoidable one. If you measure each square from the edge of the previous square, every small inaccuracy adds to the next, and by column ten the drift is real. Measure every interval from the master lines instead (absolute positions, not relative ones) and the errors stay independent and small.
Two habits keep it honest across a long job. Work a full band of squares per session so colour and handling stay consistent within it, and photograph the wall straight-on from the far side of the room at the end of each day. The camera flattens the wall into something you can compare against the reference directly, which is the assessment your eye cannot make while standing eighteen inches from the surface.
Bringing It Together
The whole method reduces to four moves: find the factor, check the area consequence, print a gridded reference you can actually read at working distance, and snap the grid onto the wall from two true master lines. An 8x10 inch study, a factor of 12, 1-foot wall squares, 144 times the area to cover. That is the entire structure of the job, decided before a brush touches the surface.
Everything after that is painting, which is the part you already know how to do. The grid is not a constraint on that; it is what lets you commit to a bold mark at scale, because you already know the mark is landing in the right place.
Scaling Up to Wall Size
For further study, explore the grid perspective guide and the street art sketching guide.
Ready to Try the Grid Method?
Put these techniques into practice with our free grid generator tool—trusted by 170,000+ artists worldwide.
Create Your Grid Now →