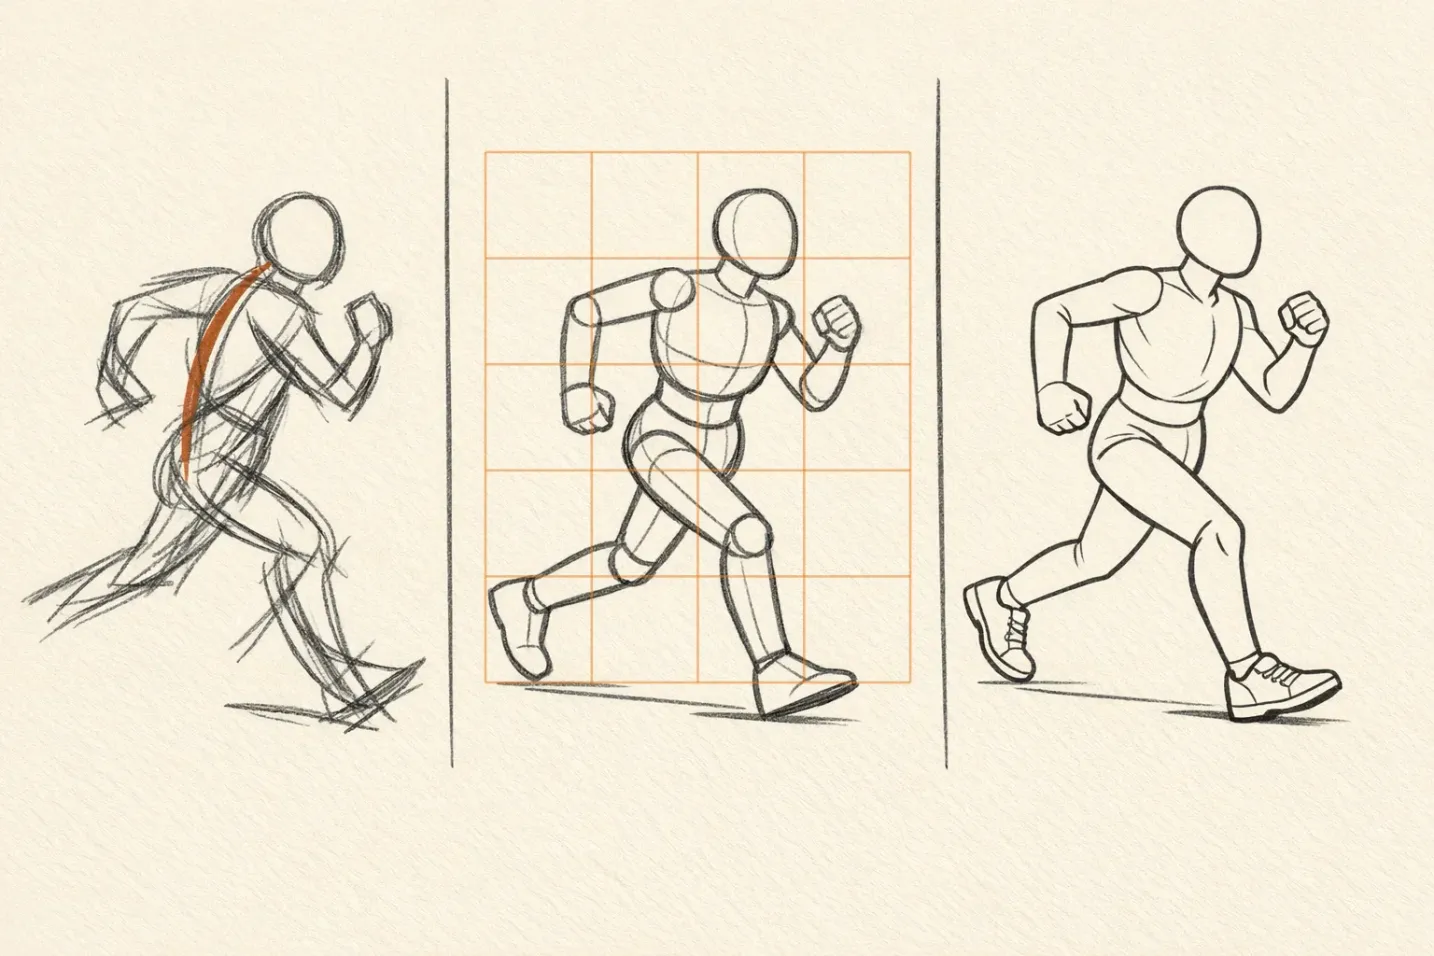

Your figures look like they are standing still even when the reference is mid-sprint. That is almost never an anatomy problem — it is that you drew the outline before you decided what the pose was doing. The fix is two passes with two different jobs: a 30-second gesture that commits to the movement, and a head-unit grid that catches the proportions the gesture got wrong. Neither works alone. The grid has to come off the reference, not off your own sketch, or it will just agree with you.
What a Gesture Pass Is Actually For
A gesture pass throws away anatomy on purpose. In 30 seconds you can record one thing: what the body is doing. The instrument for that is the line of action, a single imaginary curve running through the figure from the head down through the torso to the supporting foot, stating the main direction of the pose before any contour exists. Preston Blair made it the first mark in the sequence in Advanced Animation (1947): draw the line of action, then build the figure over it.
Lines of action come in three usable shapes. A C-curve reads as compression or protection, an S-curve as flowing movement, a straight line as power or rigidity. Push the curve further than the reference does. Not much: a reference that reads as a 20-degree lean wants about 30 on the page.
How you make the marks matters less than that the pencil keeps moving. Three approaches that all achieve this:
- Continuous line. Never lift the pencil. The forced connections between body parts produce flowing marks and stop you drawing the figure as separate objects.
- Mass gesture. Work with the side of the pencil and describe volume rather than edge. Useful when the pose is about weight rather than direction.
- Scribble. Build the figure from accumulated overlapping marks. Suited to poses too fast or too extreme to state in one line.
A gesture that worked shows where the weight sits. Look for which foot is carrying the body, and for the compression and stretch that go with it: the side of the torso the weight is on shortens, the other side opens up.
Line quality is doing real work here, not decoration. A mark made in one confident movement carries direction; the same shape built from four tentative repairs does not, however accurate it ends up being. If you find yourself feathering a line, you have stopped drawing the pose and started negotiating with the paper.
Where the line of action sits on the page matters as much as its shape. A near-vertical action line reads as stable even on a figure that is sprinting, so tilt it: place the action line along a diagonal of the sheet and the pose gains energy before you have drawn a single limb. Leave the space the figure is moving into empty, because a running figure with its nose against the edge of the paper reads as blocked rather than fast.
The Grid That Means Something: Head Units
A figure grid only helps if its rows mean something. Use the head as the unit — the subject's own head, from the top of the skull to the bottom of the chin — so it scales with any model and any paper size. A realistic adult runs about 7.5 heads tall; the idealized figure used in illustration and comics runs 8, which is why 8 is the easier canon to learn on: the landmarks fall on whole rows. Mastering Anatomy with the Grid Method works through the full landmark list at rest. This post is about what happens to those rows once the figure moves.
On the 8-head canon those lines are not guesses, they are fixed: chin at row 1, shoulders just under it at 1.5, nipple line at 2, bottom of the ribcage at 3, pubic bone at 4 (the halfway point of the entire body), knees at 6, soles at 8. Rule those seven and you have a grid whose every line means something, which is what a plain square grid can never give you.
A practical shortcut for action references: GridMyPic's Outline Studio reduces a busy photo to its main contours in one slider move, so the line of action stays visible instead of drowning in background detail. Grid the outline, not the noise. Try it with your reference.
How to Combine Gesture and Grid Without Killing Either
A grid you rule over your own sketch cannot check anything. It confirms whatever you already drew, because you drew it. A grid only works as a check when it comes from somewhere you did not invent: the reference. So the order is grid the reference, draw the gesture blind, then compare.
Stage one: grid the reference and the paper, then put the reference face down. Divide the photo into 8 rows and 4 columns with the image grid generator, rows running from the top of the skull to the sole of the supporting foot. Rule the same 8x4 division on your paper in 2H, as light as you can. Then turn the reference over. You are not going to copy cells; the grid is a ruler you will use later, not a tracing aid.
Stage two: draw the gesture in 30 seconds, ignoring the grid completely. One action line, then the ribcage and pelvis as two masses, then the limb axes. Look at the pose, not at the paper. Do this three or four times on the same sheet and keep the one with the most movement in it. If you are still drawing at 45 seconds you have started on contours; stop and begin again.
Stage three: compare, then change one thing. Now read where the landmarks fell against the rows. Chin, pit of the neck, pubic bone, knees. On a running figure the pubic bone will almost always sit high: under time pressure beginners lengthen the torso and shorten the legs, every time. Drop the pelvis onto row 4 and redraw the legs off it. Then stop. Change one thing per pass — after the third correction you are spending energy faster than you are buying accuracy, and the drawing goes stiff.
How you know it worked: cover the drawing, look at it for one second, look away. If you can say what the figure is doing, the gesture survived. If you can only say what it is made of, you refined too far.
When the rows stop matching. A running or leaping figure is rarely 8 rows tall on the page — legs cross the body, the torso tips, an arm points at the camera. That is not the grid failing, it is the grid telling you the pose is foreshortened. Measure what the reference actually shows, then ask a different question of it: could a ribcage and a pelvis both still fit inside the torso you drew? Does the upper arm still read as longer than the forearm? Head units check a standing figure's heights. On a moving figure they check whether the parts could still function as a body.
Force, Weight and What Moves Second
A figure that is not balanced over its own centre of gravity reads as falling, whatever the anatomy does. Find the supporting foot first and check that the pit of the neck sits more or less above it in a standing pose. In a running or jumping figure it deliberately does not, which is what makes the pose read as motion rather than as a stance.
Contrapposto is the standing version of that check. The weight goes onto one leg, the hip on that side rises, and the shoulder on the same side drops, so shoulders and hips tilt in opposite directions and the spine takes a shallow S. Draw those two lines before you draw the torso and the weight shift is already correct.
Compression and extension carry the forces. Bent joints, contracted muscles and impact points compress; reaching limbs, arched backs and trailing hair extend. Drawing both on the same figure is what makes it look like something is acting on it.
The fastest way to learn which moment of an action to draw is to draw several. Take one movement, a jump or a punch or a step, and make a gesture at four or five points through it: the crouch, the push-off, the extension, the landing. Sequencing them makes obvious what a single study hides, which is that the readable pose is usually one or two frames off the peak. You can compress this into a single drawing by ghosting: indicate the position immediately before or after the main pose in a much lighter line, which suggests where the body came from without turning the sheet into two figures.
Movement also arrives in the wrong order, which is useful. Anticipation, secondary action, and follow-through with overlapping action are three of the twelve animation principles Frank Thomas and Ollie Johnston set out in The Illusion of Life (1981), and they transfer directly to a static drawing. A torso can lead while the limbs lag behind it. Hair and clothing settle a beat after the body they hang from. A pose caught just before or just after the peak of an action reads as more alive than the peak itself, because the peak is the one moment that looks posed.
Working with Foreshortening
Foreshortening breaks the proportions you know, and the honest response is to trust what you measure over what you remember. A limb pointing at the camera can occupy a third of its usual length on the page.
Two habits make it manageable. Build the major masses as boxes or cylinders in perspective first, then put anatomy inside them, so the ribcage and pelvis keep their spatial relationship even when their outlines are unrecognisable. And state the overlaps clearly, using heavier line and more detail on whatever is in front, because a foreshortened figure with ambiguous overlaps reads as flat rather than as short.
Direct measurement backs both up. Hold the pencil at arm's length, lock your elbow, and compare the foreshortened part against a part you can see fully, then check that ratio against the drawing.
How to Practise
Timed poses teach you what to drop, and the order matters more than the total. Run the session the way a life-drawing class does: twenty minutes of 30-second poses, twenty of one-minute, twenty of two-minute, then five to ten minutes per pose for whatever time is left. Short first is not a warm-up convention, it is the whole mechanism: thirty seconds is too short to draw anything but the action line, so you spend twenty minutes with no option except the thing you are trying to learn. Start with the long poses instead and you spend the session practising outlines.
The kit is small. A 2B or softer pencil, because a hard lead encourages careful contours at exactly the moment you should not be drawing them. A 2H for the grid lines, kept light enough to ignore. Cheap paper in quantity, since the method depends on drawing the same pose four times and binning three. A kneaded eraser for lifting rather than scrubbing. And a timer that you do not have to look at: an interval timer on your phone, set to announce the change, so nothing about the clock competes with the pose for your attention.
Traditional media still matters for the same reason a musician practises scales on the instrument: the feedback loop between hand, tool and surface is what gets automated, and it only automates through repetition of the actual movement. A digital grid overlay you can toggle on and off is genuinely convenient for checking proportions without leaving marks, but it is a checking tool, not a substitute for the pass that trains your hand.
What to Draw From
Life drawing gives you what no photograph does: a model who shifts, breathes and settles, so you are drawing a body under load rather than a frozen shape. Short poses in a life class are the cheapest access to this.
Photographs work when they are chosen for movement rather than for clarity. Sports photography, dance and martial arts references show bodies mid-transfer of weight. A slightly blurred action frame is often better reference than a crisp one, because the blur is a record of the direction of travel. Video is better still, since you can step through the frames and pick the moment that reads, which is rarely the peak of the action.
Keep a sketchbook for people who are not posing. Someone waiting for a bus shifts weight every few seconds, and each shift is a two-line gesture. Master studies serve the same purpose from the other end: look at how Michelangelo, Degas or Frazetta got the weight into a figure, and copy the method rather than the marks.
Common Questions About Dynamic Figure Drawing
The same gesture-then-verify order applies to animals, where the action line runs through the spine and the grid catches the leg lengths: How to Draw Animals in Motion with the Grid Method. For the standing figure and the full landmark list this post only touches on, see Mastering Anatomy with the Grid Method.
Ready to Try the Grid Method?
Put these techniques into practice with our free grid generator tool—trusted by 170,000+ artists worldwide.
Create Your Grid Now →