How to Draw Perfect Symmetry with Grid Drawing Techniques
Master the art of drawing perfect symmetry with grid drawing techniques! Learn how grids can enhance your sketch precision, making complex subjects manageable while refining your overall skills. Transform your art with this essential method today!
How to Draw Perfect Symmetry with Grid Drawing Techniques
Drawing perfect symmetry can be one of the most challenging aspects of sketching for many artists. While some might argue that perfect symmetry is not always essential for great art, mastering this skill can significantly enhance the precision and proportions of your drawings. One of the most effective methods for achieving symmetry is through the use of grid drawing techniques. This method can help artists of all levels ensure accuracy in their work, and as a fundamental aspect of art education, it's critical to understand how to utilize grids properly.
In this blog post, we'll dive deep into the process of employing grid drawing techniques to achieve perfect symmetry. We'll cover the benefits of using grids, how to set them up, and tips for drawing accurate symmetrical sketches.
Benefits of Grid Drawing
Grid drawing techniques serve multiple purposes. First and foremost, they provide a framework that guides your proportions, making it easier to replicate images with high accuracy. This is especially helpful if you're working from a reference photo or need to scale a smaller image up to a larger format. Grids help break down complex subjects into manageable sections, making it more straightforward to achieve symmetrical proportions and fine details.
Secondly, grids help train your observational skills. By focusing on individual sections within the grid, you're forced to look more closely at the relationships between different parts of the image. This scrutiny helps you better understand the structure and forms you’re drawing, which in turn improves your overall sketching abilities.
Lastly, grids are invaluable when teaching art education. They provide a step-by-step method that can simplify drawing for beginners while also offering a robust tool for more advanced artists to refine their skills.
Setting Up Your Grid
To start drawing with grids, you’ll need a few key materials: paper, a pencil, a ruler, and an eraser. Here’s a step-by-step guide to setting up your grid:
- Choose Your Dimensions: Decide on the dimensions of the grid. For beginners, a 1-inch by 1-inch grid is often manageable. You can later experiment with different sizes depending on the complexity of the subject and the level of detail you require.
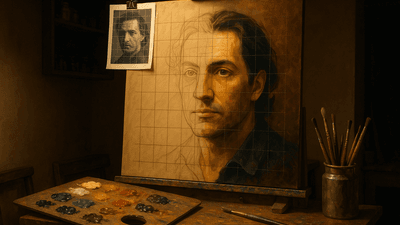
- Draw the Grid on Your Reference Image: If you're working with a reference photo, use a transparent overlay or draw directly on a printout to mark out the grid. Make sure the grid lines are evenly spaced and that the reference image is centered within the grid.
- Recreate the Grid on Your Drawing Paper: Using a ruler and a light pencil, recreate the same grid on your drawing paper. Ensure the number of squares and proportions exactly match those on the reference image.
Transferring the Image
Once your grid is set up on both the reference image and your drawing paper, you can begin the transferring process. Follow these steps for a symmetrical and accurate drawing:
- Start with the Outlines: Begin by sketching the main outlines within each square of the grid. Focus on transferring what you see in the corresponding square of the reference image to your drawing paper. Pay close attention to proportions and angles.
- Add Details Gradually: With the main outlines in place, move on to adding details within each section. Work systematically from one part of the grid to another to maintain consistency and symmetry. Use the grid lines as guides to measure distances and relationships between different parts of your drawing.
- Check Your Work Frequently: Regularly step back and view your drawing from a distance to check for symmetry and proportion errors. The grid helps, but your eye can often catch inconsistencies that might not be immediately evident.
Refining Your Drawing
After you’ve transferred the basic structure and details of your image, it’s time to refine your drawing. Here are some tips to help you in the refinement phase:
- Smooth Out Lines: Use a softer pencil to go over your rough sketches, refining and smoothing out the lines. Ensure every curve and angle matches what’s in your reference image.
- Erase Grid Lines: Once you’re satisfied with your outlines and details, carefully erase the grid lines. Be sure to use a light touch to avoid smudging your drawing.
- Add Shading and Textures: If your drawing requires shading or texturing, now is the time to add these elements. Take your time and work section by section to maintain the symmetry and proportions set by your grid.
Advanced Tips for Grid Drawing
For those looking to go beyond the basics, here are some advanced tips that can help you take your grid drawing technique to the next level:
- Use Diagonal Grids: Adding diagonal lines to your grid can further help with the alignment of complex shapes and forms. These additional lines provide extra points of reference to ensure accuracy.
- Experiment with Different Grid Sizes: Depending on the level of detail in your drawing, you might want to experiment with finer or coarser grids. Smaller squares can be helpful for highly detailed work, while larger squares may suffice for simpler images.
- Use Digital Tools: Digital art programs often come with built-in grid tools. These can be a great way to practice your skills, especially if you prefer working on a digital canvas.
Common Challenges and Solutions
Here are some common challenges artists face when using grid drawing techniques, along with solutions to overcome them:
- Misaligned Grids: Ensure both your reference image and drawing paper grids are precisely aligned. Use a ruler and take your time during the setup phase to avoid this issue.
- Over-Reliance on Grids: While grids are helpful, they should not be a crutch. Practice freehand drawing to improve your skills outside of the grid method.
- Inconsistent Proportions: Regularly compare your drawing with the reference image, taking note of any section where proportions seem off. Make small adjustments as needed to maintain accuracy.
Conclusion
Perfecting symmetry with grid drawing techniques is a valuable skill that can greatly enhance your artwork. By setting up a precise grid and carefully focusing on each section, you can achieve remarkable accuracy and proportions in your drawings. Whether you are a beginner or an experienced artist, incorporating grid drawing into your practice can refine your skills and improve your overall art education.
Remember that practice makes perfect. The more you work with grids, the better you'll become at seeing and replicating symmetrical structures. Happy sketching!