Capturing animals in motion presents unique artistic challenges, requiring understanding of anatomy, movement patterns, and dynamic forces. The grid method provides a structured framework for accurately depicting fleeting moments of animal movement. For comprehensive grid techniques applicable to dynamic subjects, explore our complete grid drawing guide.
Drawing animals in motion represents one of the most challenging yet rewarding aspects of wildlife art. Unlike static subjects, animals in movement require artists to understand not just anatomy, but the physics of locomotion, the rhythm of gaits, and the subtle ways momentum affects form. The grid method, traditionally associated with static subjects, becomes an invaluable tool when adapted for dynamic animal poses, providing structure without sacrificing the essential energy of movement. For foundational anatomy knowledge, see our guide on drawing human figures with the grid method.
Understanding Animal Movement Dynamics
If you’re drawing animals in motion, a grid helps you keep the big masses and limb placements consistent while you study movement. You can add one with our grid maker online.
Animal locomotion follows biomechanical principles that create predictable patterns. Understanding these patterns transforms random observation into informed artistic decisions. Different species exhibit characteristic movement signatures: the suspension phase of a galloping horse, the sinuous flow of a hunting cat, or the reciprocal wing beats of birds in flight.
Movement creates specific anatomical changes: muscle tension and relaxation, skeletal articulation, and balance shifts. The grid method helps artists map these complex transformations accurately, ensuring that depicted motion appears natural rather than frozen or distorted.
The Science Behind Animal Motion
Every animal moves according to its evolutionary adaptations. Quadrupeds demonstrate distinct gait patterns - walk, trot, canter, and gallop - each with specific footfall sequences and body positions. Birds utilize different wing positions for takeoff, cruising flight, and landing. Understanding these patterns provides the foundation for believable motion drawings.
The skeletal system acts as the framework for all movement. Joints have specific ranges of motion that determine possible positions. The spine flexibility varies dramatically between species - a cheetah's flexible spine allows extreme extension during running, while a horse's more rigid spine provides power through different mechanics. Artists who understand these limitations avoid creating anatomically impossible poses that break viewer immersion.
Muscle groups work in opposition - when one contracts, its opposite relaxes. This principle creates the dynamic tensions visible in moving animals. The powerful haunches of a leaping cat show bunched muscles on the pushing leg while the reaching leg displays elongated forms. These opposing forces create the visual drama of motion.
Capturing the Essence of Movement
Movement in art goes beyond mere positional accuracy. The essence of motion involves conveying weight, momentum, and energy. A running animal carries its mass differently than a standing one. The center of gravity shifts, creating lean angles and compensatory positions that the grid method helps capture accurately.
Successful motion drawings balance anatomical precision with gestural energy. The grid provides the framework for accuracy, but within each grid square, lines must flow with the movement's direction. This combination of structure and fluidity distinguishes masterful animal motion art from stiff, mechanical representations.
Selecting and Preparing Motion References
Working from quality references forms the foundation of successful animal motion drawings. The challenge lies not just in finding clear images, but in selecting moments that effectively communicate movement while providing sufficient anatomical information for accurate rendering.
Choosing Effective Reference Material
Quality motion references display several essential characteristics that make them suitable for grid-based drawing:
Clear Action Phases:
- Distinct movement moments that show characteristic positions
- Visible anatomical details despite the action
- Unobstructed views of the animal's form
- Sharp focus on key areas despite motion blur
- Lighting that reveals form and muscle definition
Compositional Considerations:
- Dynamic angles that emphasize the movement
- Environmental context showing interaction with surroundings
- Multiple sequential frames for understanding complete motion
- Varied lighting conditions revealing different aspects of form
- Background contrast that clarifies silhouettes
Modern wildlife photography provides exceptional resources. High-speed cameras capture moments invisible to the human eye - the complete extension of a cheetah at full sprint, the precise moment a bird's wings reach maximum upstroke, or the muscular tension in a horse clearing a jump. These frozen moments reveal anatomical truths essential for accurate motion depiction.
Reference Preparation Strategies
Preparing references for grid application requires systematic analysis:
Sequential Analysis:
- Study complete movement cycles, not isolated moments
- Identify key positions that define the action
- Note transitional states between major positions
- Understand motion arcs and paths of movement
- Recognize recurring patterns in gait cycles
Grid Application Planning:
- Consider motion direction when orienting the grid
- Account for areas of motion blur or less clarity
- Plan grid density for different body regions
- Anticipate overlapping forms and foreshortening
- Determine focal areas requiring finest grid divisions
The most effective approach involves studying multiple references of the same movement. Different angles reveal different aspects - a side view shows the full extension of limbs, while a three-quarter view reveals depth and volume. Combining insights from multiple references creates more complete understanding than relying on a single image.
Grid Strategies for Dynamic Subjects
Adapting the grid method for moving animals requires strategic thinking about grid placement, density, and application. Unlike static subjects where uniform grids often suffice, motion drawings benefit from variable approaches that respond to the subject's dynamics.
Adaptive Grid Density
Motion drawings benefit from strategic grid variations that correspond to the importance and complexity of different body areas:
Dense Grids for Critical Areas:
- Head and facial features where expression matters
- Joint articulations showing precise angles
- Muscle definition revealing tension and effort
- Critical anatomical landmarks defining the pose
- Areas of complex overlapping forms
Moderate Grids for Supporting Elements:
- Large body masses with simpler forms
- Limb positions between joints
- Environmental elements providing context
- Motion indicators like dust or water splashes
- Background elements suggesting speed
Sparse Grids for Atmospheric Areas:
- Distant background elements
- Areas intentionally left loose for effect
- Motion blur zones
- Atmospheric effects
- Negative spaces enhancing movement
The key lies in planning grid density before beginning. Analyze the reference to identify areas requiring precision versus those benefiting from gestural freedom. This preliminary planning prevents the common mistake of applying uniform detail throughout, which often results in stiff, overworked drawings lacking movement energy.
Motion-Specific Grid Placement
Strategic grid positioning enhances rather than hinders movement depiction:
1. Align with Action Line: The grid orientation should follow the primary motion direction. For a leaping deer, angle the grid along the jump trajectory rather than keeping it horizontal. This alignment helps maintain movement flow throughout the drawing process.
2. Capture Extremes: Ensure the grid encompasses the full range of movement, including extended limbs and flowing elements like manes or tails. Planning for these extremes prevents cramped compositions that constrain the sense of motion.
3. Center Mass Focus: While limbs create movement drama, accurate body core placement anchors the entire drawing. The grid should provide clear reference points for the ribcage, pelvis, and spine alignment.
4. Peripheral Freedom: Allow grid squares at the periphery to be larger, giving freedom for gestural expression of movement. This technique maintains accuracy where needed while preserving dynamic energy at the edges.
Grid Modification Techniques
Advanced artists modify standard grids to better serve motion subjects:
Radial Grids: For rotating movements like a spinning cat, radial grids centered on the rotation axis provide more natural reference lines than rectangular grids.
Curved Grids: Following the arc of movement with curved grid lines helps maintain flow in drawings of jumping or diving animals.
Perspective Grids: Animals moving toward or away from the viewer benefit from perspective-based grids that account for foreshortening.
Composite Grids: Combining different grid types in one drawing - perhaps a standard grid for the body with radial elements for spinning limbs - provides maximum flexibility.
Anatomical Foundations for Animal Motion
Understanding anatomy transforms animal motion drawing from guesswork into informed artistic decisions. Each species possesses unique skeletal and muscular adaptations that determine their movement capabilities. The grid method provides the framework for capturing these anatomical truths accurately while maintaining the energy of motion.
Understanding Skeletal Mechanics
The skeleton provides the fundamental architecture of movement. Different animal groups demonstrate distinct mechanical principles that artists must understand to create believable motion drawings.
Quadruped Movement: Quadrupedal locomotion varies dramatically between species based on skeletal structure. The spine acts as a flexible spring in galloping predators like cheetahs, allowing extreme extension and compression. In contrast, ungulates like horses maintain relatively rigid spines, generating power through long limb levers.
- Spine flexibility determines stride length and speed potential
- Leg sequence patterns create distinct gaits - walk, trot, pace, canter, gallop
- Weight distribution shifts with each phase of movement
- Balance points change dramatically between static and dynamic positions
- Joint angles reveal the phase of stride cycle
The length relationships between bones create each species' characteristic movement. A deer's long metacarpals create their distinctive high-stepping gait, while a bear's plantigrade stance produces their rolling walk. Understanding these skeletal proportions prevents common drawing errors like giving a horse deer-like legs or depicting a cat with canine proportions.
Avian Flight Mechanics: Bird flight involves complex three-dimensional movement that challenges artists to understand aerial mechanics:
- Wing bone articulation follows specific patterns during flight cycles
- Primary and secondary feather groups move independently
- Body angle adjustments maintain stability and direction
- Tail functions as both rudder and brake
- Leg positioning affects aerodynamics and balance
Different flight styles require different anatomical emphasis. Soaring birds show extended, locked wings with separated primary feathers. Hummingbirds demonstrate figure-eight wing patterns invisible to the naked eye but crucial for accurate depiction. Diving birds like falcons fold wings in specific configurations that the grid method helps capture precisely.
Aquatic Propulsion: Marine animals demonstrate movement principles foreign to terrestrial experience:
- Lateral undulation in fish creates S-curves through the body
- Fin coordination provides stability and steering
- Streamlining positions minimize water resistance
- Buoyancy control through swim bladders affects posture
- Tail fin angles determine thrust direction
The grid method excels at capturing the sinuous curves of swimming motion. By mapping the centerline of the body through grid squares, artists can accurately reproduce the wave patterns that propel fish and marine mammals through water.
Muscular Systems in Action
Muscles create the visible drama of movement. Understanding how muscle groups work during motion prevents the common mistake of depicting animals as if they were flexing all muscles simultaneously.
Extension Phases: During the reaching phase of movement, specific muscle groups stretch while others contract:
- Stretched muscle forms create long, elegant lines
- Tendon prominence becomes visible at full extension
- Elongated proportions differ from resting positions
- Surface tension creates subtle form changes
- Skin pulls taut over underlying structures
The grid method helps artists observe how stretching affects proportions. A reaching cat's body can extend to nearly twice its resting length, with corresponding changes in muscle forms that must be accurately captured to appear believable.
Contraction Phases: Power generation creates dramatic form changes:
- Bunched muscle masses bulge beyond normal contours
- Shortened proportions compress standard measurements
- Power indicators like raised veins become visible
- Force directions show through muscle fiber alignment
- Deep shadows form between contracted muscle groups
Understanding which muscles engage during specific movements prevents anatomical errors. The powerful gluteal muscles of a jumping horse bunch dramatically, while the opposing quadriceps stretch. This reciprocal action creates the dynamic tension that brings motion drawings to life.
Species-Specific Movement Patterns
Each animal family demonstrates characteristic movement patterns that artists must understand:
Feline Movement: Cats epitomize fluid motion through extreme spinal flexibility. Their movement patterns include:
- Spine compression and extension during running creates dramatic length changes
- Independent shoulder blade movement allows reaching beyond skeletal limits
- Retractable claws affect foot placement and grip
- Tail positioning provides balance and expression
- Muscular control allows near-silent movement
The grid method helps capture the subtle S-curves that characterize feline motion. Even in full sprint, cats maintain sinuous body lines that distinguish them from the more angular movements of canines.
Canine Locomotion: Dogs demonstrate efficient distance-covering gaits. To apply grid techniques to any subject, use GridMyPic's free tool for instant grid overlays:
- Double-suspension gallop in sighthounds like greyhounds
- Efficient trotting gaits for endurance
- Play movements involving rapid direction changes
- Social signaling through body posture during movement
- Tail positions indicating emotional states while running
Equine Gaits: Horses provide classic studies in quadrupedal movement:
- Four basic gaits with distinct footfall patterns
- Collection versus extension affecting stride length
- Lead changes in canter and gallop
- Jumping mechanics involving radical posture changes
- Head and neck positioning for balance
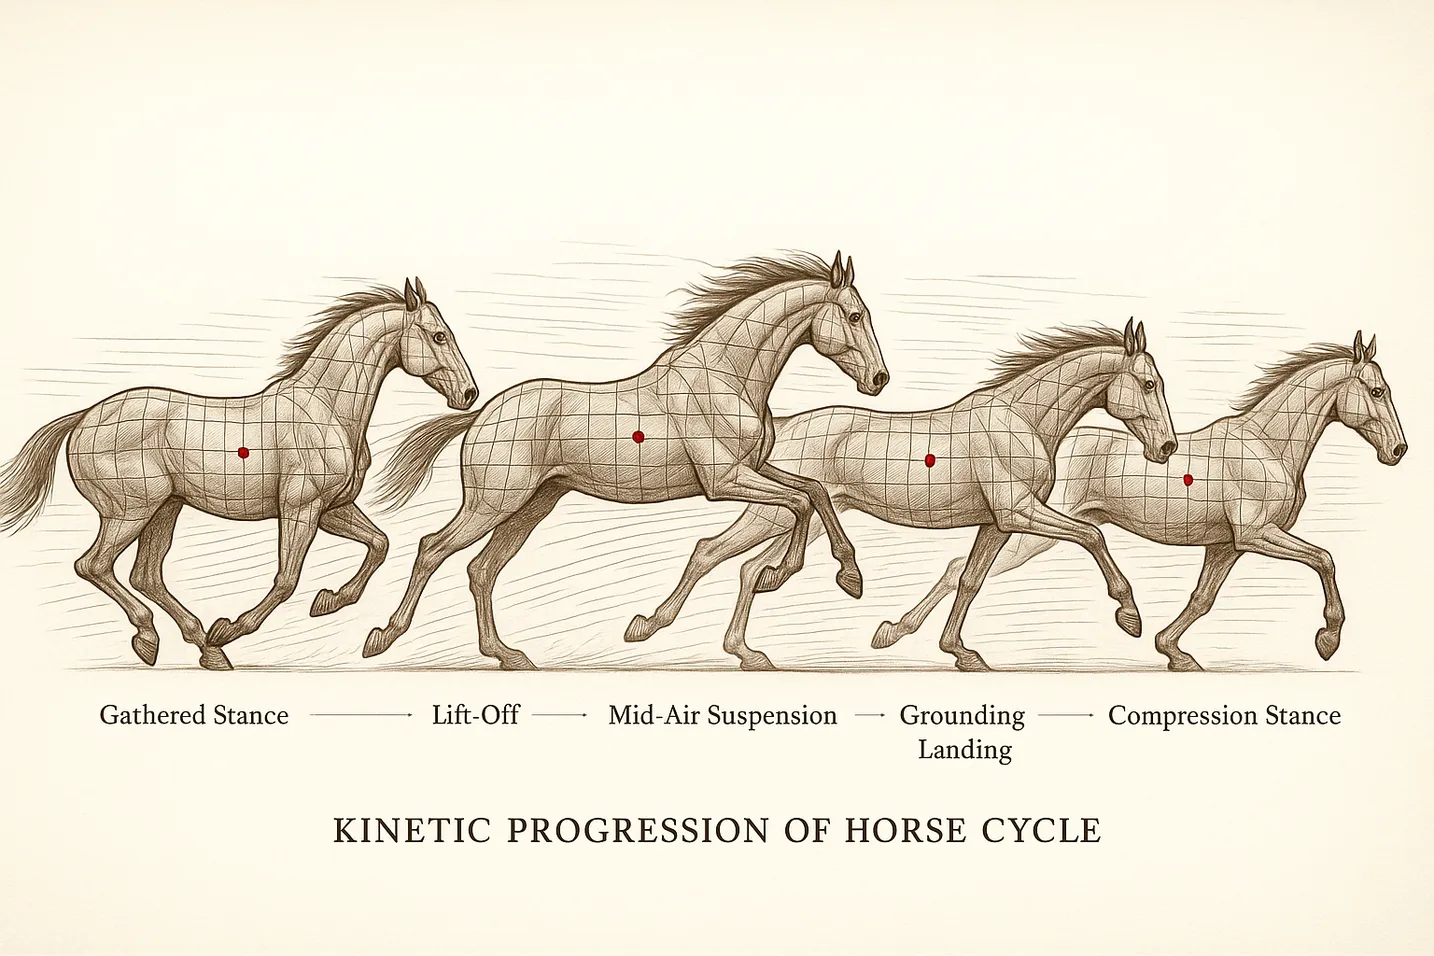
The grid method excels at capturing the precise moment of suspension in a horse's gallop, where all four feet leave the ground - a phenomenon not understood until Muybridge's photographic studies.
Capturing Specific Movement Types
Different types of animal movement present unique challenges and require specific observational strategies. The grid method adapts to each movement type, providing structure while preserving the distinctive characteristics of each action.
Running and Galloping
Running represents the most common dynamic movement artists attempt to capture. Understanding the mechanics of different running gaits prevents common errors that make drawings appear unnatural.
Key Observations: The suspension phase defines dramatic running poses. In a full gallop, horses experience a moment where all four feet leave the ground simultaneously. This suspended moment, captured famously in Muybridge's photographic studies, occurs twice in each stride cycle - once with legs gathered beneath the body, once with legs extended.
- Suspension phases create the most dynamic compositions
- Ground contact patterns vary by species and speed
- Body compression and extension cycles drive forward motion
- Limb cycling rhythms create predictable patterns
- Head and neck positions counterbalance body movement
Grid Focus Areas: When applying grids to running animals, certain anatomical relationships require careful attention:
- Shoulder/hip alignment determines body angle and momentum
- Spine curvature indicates effort and speed intensity
- Leg positions must reflect accurate joint angles
- Head/neck angle shows balance and focus direction
- Tail position indicates speed and emotional state
The grid method helps maintain proportional accuracy during extreme positions. A galloping horse's body length can appear to change dramatically between gathered and extended phases, but skeletal proportions remain constant. Grid squares provide reference points ensuring these relationships stay accurate.
Speed Variations: Different speeds create distinct visual patterns:
- Walk: Always maintains three points of ground contact
- Trot: Diagonal pairs move together, creating bounce
- Canter: Asymmetrical three-beat gait with moment of suspension
- Gallop: Maximum speed with extended suspension phases
Each gait requires different grid emphasis. Walking poses benefit from regular grids capturing subtle weight shifts. Galloping poses need variable grids accommodating extreme positions while maintaining accuracy in critical areas.
Jumping and Leaping
Jumping movements combine preparation, explosive action, and controlled landing into a dramatic sequence. Each phase presents unique drawing challenges that the grid method helps resolve.
Critical Moments: Successful jump drawings capture the essence of explosive movement:
- Preparation crouch shows coiled potential energy
- Launch extension reveals maximum muscular effort
- Aerial positioning demonstrates body control
- Landing preparation indicates spatial awareness
- Follow-through completes the movement narrative
Anatomical Changes During Jumping: The body undergoes dramatic transformations during jumping sequences:
- Compressed forms in preparation store elastic energy
- Extended forms during launch show maximum reach
- Center of gravity shifts throughout the movement arc
- Limb coordination maintains balance and direction
- Muscle groups alternate between loading and releasing
The grid method proves invaluable for maintaining consistency across these dramatic changes. By establishing key anatomical landmarks within the grid, artists can accurately track how the body transforms through each phase.
Environmental Context: Jumping drawings gain impact through environmental interaction:
- Ground depression at takeoff point
- Dust or debris clouds showing force
- Shadow placement indicating height
- Background elements providing scale
- Landing surface preparation
Grid planning should include these environmental elements, ensuring proper spatial relationships between the animal and its surroundings.
Flying and Gliding
Avian movement presents unique challenges combining complex wing mechanics with subtle body adjustments. The grid method helps decode these three-dimensional movements into drawable two-dimensional representations.
Wing Positions Throughout Flight Cycle: Understanding wing mechanics prevents common drawing errors:
- Upstroke characteristics vary by flight style
- Downstroke power phase generates lift and thrust
- Gliding configurations show aerodynamic efficiency
- Maneuvering adjustments demonstrate control
- Feather group movements add authenticity
Different bird families show distinct flight patterns. Raptors soar with locked wings, requiring grids that capture subtle angle adjustments. Hummingbirds create figure-eight patterns needing flexible grids accommodating rapid position changes. Waterbirds show deep, powerful strokes requiring grids that capture full range of motion.
Body Dynamics in Flight: The body maintains specific positions for aerodynamic efficiency:
- Streamlined positions minimize drag
- Head stabilization maintains visual focus
- Tail movements provide steering and braking
- Leg positioning affects aerodynamics
- Body angle adjustments control altitude
Grid application for flying birds requires understanding three-dimensional form. The grid must account for wing foreshortening, body rotation, and the complex curves created by extended flight feathers.
Swimming and Aquatic Movement
Aquatic animals demonstrate fluid movements challenging traditional grid applications. The sinuous nature of swimming requires adaptive grid strategies.
Undulating Movements: Fish and marine mammals create propulsion through body waves:
- S-curves travel from head to tail
- Amplitude increases toward the tail
- Frequency indicates speed and effort
- Fin positions provide stability
- Body flexibility varies by species
The grid method captures these flowing movements by mapping key points along the body's centerline. This approach maintains proportional accuracy while allowing for the fluid curves essential to convincing aquatic movement.
Surface Interactions: Animals breaking the water's surface create complex visual effects:
- Water displacement patterns
- Splash dynamics following movement
- Surface tension effects on emerging forms
- Refraction distorting underwater portions
- Foam and bubble trails indicating path
Including these elements in grid planning enhances the sense of movement and environmental interaction.
Progressive Drawing Process
Creating convincing animal motion drawings requires a systematic approach that builds from gesture to finished detail. The grid method provides structure throughout this process while maintaining the essential energy of movement.
Phase 1: Gesture Capture
The initial gesture phase establishes the movement's essence before details obscure the overall action. This foundation determines the drawing's ultimate success.
Using Light Grid Guidelines: Begin with a lightly drawn grid that won't dominate the initial gesture work. The grid serves as a reference framework rather than a constraint during this exploratory phase.
1. Action Line: The action line represents the primary movement direction and energy flow through the animal's body. This curved or angled line typically follows the spine but can deviate to emphasize movement dynamics. In a leaping cat, the action line might arc dramatically from rear legs through to extended front paws. For a galloping horse, it might undulate to show the rhythmic nature of the gait.
2. Mass Distribution: Major body shapes get blocked in as simple forms - ovals, circles, and cylinders. These shapes capture volume and proportion without getting caught in details. The grid helps maintain accurate size relationships between these masses. A bear's massive shoulders might occupy four grid squares while the narrower hips take only two, establishing the characteristic body proportions immediately.
3. Limb Arcs: Movement paths for limbs get indicated with flowing lines that suggest the complete range of motion. These arcs help establish the movement's rhythm and ensure limbs will have adequate space in the composition. The grid provides checkpoints ensuring these arcs maintain proper attachment points and proportions.
4. Energy Flow: Dynamic forces like momentum, gravity, and muscular effort get suggested through line quality and directional marks. Quick, confident strokes convey speed and power, while careful observation of how weight transfers through the body creates believable motion.
Phase 2: Structural Development
With gesture established, structural development adds the anatomical framework that will support detailed rendering.
Building Within Grid Framework: The grid now becomes more actively used, helping place anatomical features accurately while maintaining the gesture's energy.
1. Skeletal Landmarks: Key bone positions get established using the grid for precise placement. Joint locations, spine curvature, skull angle, and pelvis position form the structural foundation. Understanding skeletal mechanics prevents impossible positions - elbows only bend one way, spines have flexibility limits, joints have specific ranges of motion.
2. Joint Articulation: Accurate connections between bones create believable movement. The grid helps maintain proper proportions as joints bend and extend. A horse's knee (actually the wrist) must align properly with the shoulder and hoof. A bird's wing joints must fold in anatomically correct sequences.
3. Proportion Verification: Grid-based checking ensures body parts maintain correct size relationships despite foreshortening and dynamic positions. The head should remain proportional to the body, limbs should match despite different positions, and features should align properly across the form.
4. Volume Construction: Three-dimensional forms get built over the skeletal structure. Cylindrical forms for limbs, egg shapes for ribcages, and wedge forms for heads create volume. The grid helps these forms maintain consistency as they rotate and overlap in space.
Phase 3: Anatomical Refinement
The refinement phase adds the specific details that bring the drawing to life while maintaining the underlying structure and gesture.
Adding Specific Details Within Structure:
1. Muscle Definition: Movement-specific muscle forms get carefully observed and placed. The grid ensures these forms attach at correct points and maintain proper proportions. Contracted muscles bunch and shorten, stretched muscles elongate and flatten. The interplay between opposing muscle groups creates the tension visible in moving animals.
2. Surface Features: Fur direction follows form and movement, adding textural interest while reinforcing the action. Feather groups overlap in specific patterns during flight. Skin wrinkles and folds respond to underlying movement. The grid helps maintain consistency in these surface treatments across the form.
3. Characteristic Details: Species-specific elements like facial features, claw placement, or distinctive markings get added with careful attention to their relationship to the moving form. These details must integrate naturally rather than appearing pasted on. An alert expression enhances forward movement, while wind-blown whiskers and mane reinforce speed.
4. Environmental Interaction: Ground contact points show weight and impact. Dust clouds indicate force and direction. Displaced grass or water adds context. These environmental elements must align properly with the grid to maintain spatial relationships.
Phase 4: Dynamic Enhancement
The final phase enhances the sense of movement through artistic techniques that go beyond mere accuracy.
Line Quality and Movement: Varied line weights create hierarchy and suggest movement. Heavier lines might anchor the animal to the ground while lighter lines let extremities feel free and mobile. Broken lines can suggest speed blur, while flowing lines enhance the sense of motion.
Value and Focus: Strategic use of light and shadow enhances three-dimensional form while directing viewer attention. Sharp contrast at focal points draws the eye, while softer values in peripheral areas suggest movement. Cast shadows ground the animal and indicate height during jumps.
Selective Detail: Not every area needs equal finish. Areas in rapid motion might remain looser and more gestural, while the face and eyes might receive careful detail. This selective approach prevents stiffness and maintains energy.
Conveying Motion Through Artistic Techniques
Beyond anatomical accuracy, successful motion drawings employ artistic techniques that enhance the viewer's perception of movement. These techniques transform static marks into dynamic representations.
Line Quality for Movement
Line work forms the foundation of movement expression in drawing. The quality, direction, and character of lines significantly impact how motion reads to viewers.
Dynamic Line Variation: Swift, confident strokes inherently convey more energy than careful, hesitant marks. When drawing a galloping horse's flowing mane, quick gestural strokes following the movement direction create convincing motion. Conversely, the grounded hooves might receive more deliberate, weighted lines emphasizing contact and stability.
- Swift strokes for areas in rapid motion
- Broken lines suggesting motion blur at extremities
- Directional marks following fur, feather, or hair flow
- Varied pressure creating rhythm and emphasis
- Continuous flowing lines for smooth movements
- Staccato marks for abrupt actions
The grid provides underlying structure, but lines should flow across grid boundaries naturally. Think of the grid as scaffolding to be removed rather than prison bars constraining the drawing.
Strategic Detail Distribution
Not every area of a motion drawing requires equal finish. Strategic distribution of detail creates focal points while maintaining overall energy.
Focus Hierarchy: The eye naturally draws most attention, making it a common focal point even in motion drawings. From there, detail gradually reduces toward areas of rapid movement. This selective approach prevents the stiffness that comes from over-rendering every area equally.
- Sharp detail at focal points like eyes and expression
- Moderate detail in important anatomical areas
- Reduced detail in rapidly moving extremities
- Minimal detail in motion blur zones
- Environmental motion indicators receiving atmospheric treatment
This hierarchy guides viewer attention while preserving the sense of movement. A completely detailed drawing often appears frozen, while selective finish maintains dynamism.
Motion Lines and Effects
Subtle indicators of movement enhance the action without resorting to cartoon-style speed lines. These environmental interactions ground the animal in reality while emphasizing motion.
Environmental Motion Indicators:
- Dust clouds rising from impact points
- Grass bending away from movement
- Water droplets following motion arcs
- Disturbed ground at launch points
- Atmospheric effects suggesting speed
Directional Elements:
- Fur or feathers swept back by wind resistance
- Manes and tails flowing with movement
- Whiskers bent by air pressure
- Ears pinned back during fast movement
- Eyes squinted against wind
These details should integrate naturally rather than appearing added as afterthoughts. The grid helps position these elements correctly in relation to the moving form.
Common Challenges and Solutions
Even experienced artists face recurring challenges when drawing animals in motion. Understanding these common issues and their solutions accelerates skill development.
Stiff or Frozen Appearance
Problem: Despite depicting an action pose, the animal appears statue-like, lacking the energy of actual movement.
Solution: The issue often stems from over-reliance on grid structure and excessive detail throughout. Solutions include:
- Prioritize gesture drawing before adding grid details
- Vary line quality dramatically between static and moving areas
- Introduce subtle motion blur in rapidly moving parts
- Check weight distribution - moving animals rarely balance evenly
- Ensure the center of gravity aligns with the movement
- Add environmental interaction elements
- Reduce detail in peripheral areas
Remember that movement involves the entire body. Even if focusing on a running leg, the rest of the body must reflect that motion through appropriate tensions and positions.
Anatomical Impossibilities
Problem: The drawn position defies physics or anatomical constraints, breaking viewer immersion.
Solution: This typically results from insufficient understanding of animal anatomy and movement mechanics:
- Study complete movement sequences, not isolated positions
- Understand species-specific joint limitations
- Verify positions with multiple reference angles
- Learn basic skeletal structure for common subjects
- Practice from slow-motion video references
- Build a library of movement studies for reference
- When uncertain, err toward conservative positions
The grid method helps prevent these errors by maintaining proportional relationships, but artists must understand what positions are possible within those proportions.
Lost Gesture in Grid
Problem: The grid structure dominates, creating a mechanical feeling that contradicts natural movement.
Solution: This common issue arises from treating the grid as the drawing rather than as a tool:
- Use the grid for proportion checking, not as drawing boundaries
- Work gesturally within and across grid squares
- Vary line weights to de-emphasize grid structure
- Consider the grid as temporary scaffolding
- Draw through forms rather than filling in squares
- Maintain flowing lines that ignore grid boundaries
- Reduce grid visibility in final work
Advanced artists often use mental grids, checking proportions without physically drawing every line.
Practice Progressions
Developing proficiency in animal motion drawing requires structured practice building from foundation skills to complex applications.
Building Motion Drawing Skills
A systematic approach develops skills progressively:
1. Static Studies: Master anatomy at rest before attempting movement. Understanding normal proportions, skeletal structure, and muscle placement provides the foundation for motion work. Create grid-based studies of animals in relaxed poses from multiple angles.
2. Simple Movements: Begin with basic movements like walking or grazing. These gentle actions involve minimal anatomical distortion, allowing focus on weight shifts and basic mechanics. Use consistent grids to track how proportions maintain during simple movements.
3. Dynamic Actions: Progress to running and jumping, where bodies undergo dramatic changes. Start with side views where motion reads clearly, then advance to three-quarter angles introducing foreshortening. Vary grid density based on movement complexity.
4. Complex Motions: Tackle fighting, playing, or prey-capture sequences involving multiple animals and rapid direction changes. These scenarios require understanding of interaction, overlapping forms, and sequential movement. Composite grids help manage multiple subjects.
5. Environmental Interaction: Add swimming, climbing, or flying scenarios where environment affects movement. Water creates different physics than land, while climbing involves grip and balance considerations. Environmental grids include context elements.
Speed Development Exercises
Timed studies develop different aspects of motion drawing:
5-Minute Gesture Captures: Focus purely on movement essence without detail. Capture the action line, major masses, and energy flow. These rapid studies train the eye to see essential movement characteristics.
15-Minute Structural Drawings: Add basic anatomy and grid verification. Establish accurate proportions and joint positions while maintaining gestural energy. These studies balance accuracy with spontaneity.
30-Minute Detailed Studies: Develop specific areas while keeping others gestural. Add muscle definition, characteristic features, and environmental elements. These focused studies build rendering skills within time constraints.
60-Minute Finished Pieces: Create complete drawings with full detail where appropriate. Balance finished areas with gestural passages. These longer studies develop stamina and decision-making about detail distribution.
Regular practice with varied time limits builds both speed and accuracy, essential for capturing fleeting animal movements.
Animal Motion Drawing Questions
Explore related motion studies in Drawing Dynamic Wildlife Using the Grid Method. For perspective control, review Understanding Perspective with Grid Drawing.
Ready to Try the Grid Method?
Put these techniques into practice with our free grid generator tool—trusted by 170,000+ artists worldwide.
Create Your Grid Now →